Achieve a 30% More Defined Contour with Cream Products: 2025 Tutorial
To achieve a 30% more defined contour with cream products in 2025, focus on selecting the right shades, blending techniques, and product layering to sculpt and enhance your facial features effectively.
Want a sharper, more sculpted look? This step-by-step tutorial will show you how to achieve a 30% more defined contour with cream products: a step-by-step tutorial for 2025, giving you a stunning, enhanced facial structure.
Understanding the Basics of Cream Contouring
Cream contouring has become a staple in makeup routines for its ability to create a naturally sculpted look. Unlike powder contours, cream products offer a dewy finish that blends seamlessly into the skin, making them perfect for achieving a soft yet defined contour.
Why Choose Cream Products for Contouring?
Cream contour products are favored for their blendability and ability to meld with the skin, providing a more natural and skin-like finish. They are also buildable, allowing for customization of intensity.
- Seamless Blend: Cream formulas melt into the skin, avoiding harsh lines.
- Buildable Coverage: Achieve subtle definition or dramatic sculpting.
- Hydrating Finish: Cream contours often contain moisturizing ingredients.
Choosing the right cream contour products can make all the difference in achieving a flawless, defined look. Cream formulas offer a natural finish and allow for easy blending, making them ideal for both beginners and experienced makeup enthusiasts.
Selecting the Right Cream Contour Shade
Choosing the right cream contour shade is crucial for achieving a natural-looking contour that complements your skin tone. The goal is to mimic the natural shadows on your face, so selecting a shade that is too warm or too cool can result in an unnatural appearance.
Matching Contour Shade to Your Skin Tone
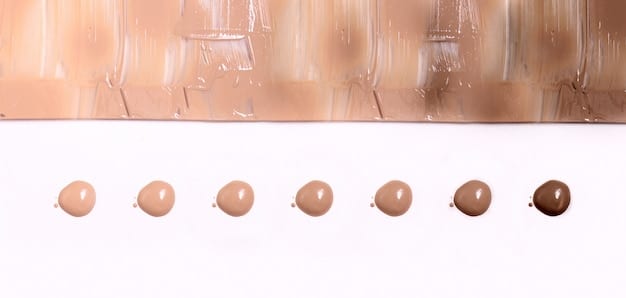
The ideal contour shade should be about two to three shades deeper than your natural skin tone. This allows the contour to create depth without appearing too harsh. Consider your undertones when selecting a shade.
For fair skin, opt for cool-toned shades with a grayish undertone to mimic natural shadows. Medium skin tones can experiment with neutral or slightly warm shades. Deeper skin tones benefit from warm, rich shades that provide noticeable contrast.
Always test contour shades in natural lighting to see how they appear on your skin. This helps ensure that the shade blends seamlessly and creates a natural-looking shadow.
Essential Tools for Cream Contouring
Having the right tools is essential for achieving a flawless cream contour application. The tools you use can influence the blendability, precision, and overall finish of your contour.
Brushes vs. Sponges: Which is Best?
Both brushes and sponges can be used to apply cream contour, but they offer different results. Brushes provide more precision and control, while sponges offer a seamless, diffused finish.
- Dense Brushes: Ideal for precise application and sculpting.
- Blending Sponges: Perfect for a seamless, airbrushed finish.
- Angled Brushes: Great for contouring the cheekbones and jawline.
Experiment with different tools to find the ones that work best for your skin and desired level of definition. Clean your tools regularly to maintain hygiene and ensure smooth application.
Step-by-Step Guide to Achieving a 30% More Defined Contour
Ready to sculpt your features? Follow this step-by-step guide to achieve a 30% more defined contour with cream products: a step-by-step tutorial for 2025.
Step 1: Prep Your Skin
Start with a clean, moisturized face. Apply your regular foundation and concealer before moving on to contouring. This creates a smooth base for the cream contour to blend seamlessly.
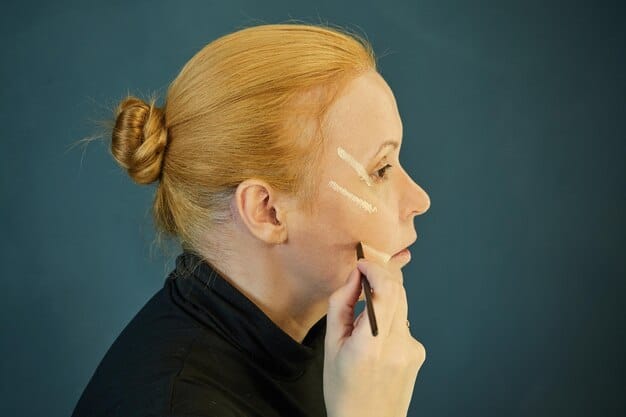
Step 2: Apply the Cream Contour
Using a contour brush or sponge, apply the cream contour to the hollows of your cheeks, along the jawline, and on the sides of your nose. Start with a small amount of product and build up as needed to avoid over-application.
Step 3: Blend, Blend, Blend
Use a damp blending sponge or a soft brush to blend the cream contour seamlessly into your skin. Focus on blending the edges to avoid harsh lines. Blend upwards on the cheekbones and downwards on the jawline for a natural gradient.
For the nose contour, blend the product along the sides of your nose bridge to create a slimmer appearance. Use light, tapping motions to avoid smudging the contour.
Highlighting to Enhance the Contour
Highlighting and contouring go hand in hand to create dimension and enhance your facial features. Highlighting the high points of your face draws light to those areas, making your contour appear even more defined.
Where to Apply Highlighter
Apply highlighter to the high points of your face, such as your cheekbones, brow bone, bridge of your nose, and Cupid’s bow. Use a light hand to avoid an overly shimmery or unnatural look.
Types of Highlighters to Use With Cream Contour
Cream or liquid highlighters work best with cream contours, as they blend seamlessly with the skin and create a dewy, radiant finish. Powder highlighters can also be used, but apply them sparingly to avoid a cakey appearance.
Experiment with different highlighter shades to find the one that complements your skin tone and contour shade. Golden or champagne highlighters work well with warm skin tones, while pearl or iridescent highlighters suit cooler skin tones.
Setting Your Cream Contour for Longevity
To ensure that your cream contour lasts all day, it’s essential to set it with a translucent powder. This helps prevent the contour from fading or creasing, especially in oily areas.
How to Set Cream Contour
Using a fluffy brush or a blending sponge, lightly dust translucent powder over the contoured areas. Focus on the areas where the contour is most concentrated, such as the hollows of your cheeks and along the jawline.
Powder Contour as an Optional Step
For extra definition and longevity, you can layer a powder contour over the cream contour. Choose a powder contour shade that matches your cream contour shade for a seamless, natural-looking finish.
Cream contouring, when set properly, can last all day and maintain the defined look you desire. Experiment with different setting powders to find the one that works best with your skin type and contour products.
| Key Point | Brief Description |
|---|---|
| 🎨 Shade Selection | Choose a shade 2-3 times deeper than your skin tone. |
| 🖌️ Blending | Blend cream contour seamlessly with a damp sponge. |
| ✨ Highlighting | Apply highlighter to high points to enhance contour. |
| ⏱️ Setting | Set with translucent powder for long lasting wear. |
Frequently Asked Questions
▼
A cream contour stick is often easiest for beginners due to the precise application. Look for formulas that are blendable and buildable, allowing for gradual intensity.
▼
Choose a contour shade that is not too warm or orange. Blend thoroughly, focusing on the edges. Start with a small amount of product and build up gradually.
▼
While you can use a deeper shade of concealer, it’s best to use a product specifically formulated for contouring, as those often have a different texture and finish.
▼
Contour mimics shadows, while bronzer adds warmth. Contour shades are typically cool-toned and matte, while bronzers are warm-toned and may have shimmer.
▼
Set your cream contour with a translucent powder and consider layering a powder contour on top for extra longevity. Use a setting spray to lock everything in place.
Conclusion
Mastering the art of cream contouring can significantly enhance your facial features, providing a sculpted and refined look. By following these steps, you can achieve a 30% more defined contour with cream products: a step-by-step tutorial for 2025, that enhances your natural beauty. Remember that consistent practice will help you refine your technique and achieve the best results.


