Advanced Eyeshadow Techniques: Pro Look 2026
Beyond the Basics: Advanced Eyeshadow Techniques for a Pro Look in 2026
Welcome, beauty enthusiasts and aspiring makeup artists! If you’ve mastered the basics of eyeshadow application and are eager to elevate your game, you’ve come to the right place. The world of makeup is ever-evolving, and 2026 brings with it exciting new trends and refinements in eye artistry. This comprehensive guide will take you through advanced eyeshadow techniques, helping you achieve a professional, polished, and truly captivating look. Whether you’re aiming for editorial perfection, a red-carpet glow, or simply want to impress with your daily makeup, understanding these advanced methods is key.
Gone are the days when a simple sweep of color was enough. Today, advanced eyeshadow techniques involve a nuanced understanding of color theory, blending, layering, and strategic placement. We’ll delve into the intricacies that separate a good eye makeup look from a truly spectacular one. Prepare to transform your approach to eye makeup and discover the secrets that professional artists swear by.
The Foundation of Mastery: Understanding Your Canvas
Before diving into complex applications, it’s crucial to revisit the fundamentals with a fresh perspective. Think of your eyelid as a canvas, and just like any great painting, a solid foundation is paramount. Mastery of advanced eyeshadow techniques begins with understanding eye shapes, skin preparation, and the right tools.
Eye Shapes and Customized Application
One of the most significant aspects of advanced eyeshadow application is tailoring the technique to individual eye shapes. What looks stunning on almond eyes might not have the same impact on hooded or monolid eyes. Recognizing and working with your unique eye shape is not about correcting flaws but enhancing natural beauty.
- Almond Eyes: Considered the most versatile, almond eyes can pull off almost any look. Focus on elongating the outer corner and creating depth in the crease.
- Round Eyes: To create a more elongated appearance, extend shadow horizontally past the outer corner. Avoid placing dark shadows directly on the center of the lid, which can make them appear rounder.
- Hooded Eyes: The key here is to apply shadow above the natural crease, on the hooded area, to create the illusion of a more open eye. Cut creases and halo eyes work exceptionally well.
- Monolid Eyes: Gradient blending from the lash line upwards is highly effective. Experiment with shimmers on the center of the lid to add dimension.
- Downturned Eyes: Lift the outer corner with an upward flick of shadow or liner to create a more lifted effect.
- Upturned Eyes: Balance the natural lift by adding a touch of darker shadow to the outer lower lash line.
Understanding these nuances is the first step in truly mastering advanced eyeshadow techniques. It allows for a personalized approach that elevates the entire look.
Prepping the Eyelid: The Unsung Hero
A flawless eyeshadow application, especially when using advanced techniques, hinges on proper eyelid preparation. This isn’t just about primer; it’s about creating the ideal surface for pigments to adhere smoothly and last longer.
- Cleanse: Start with a clean, oil-free eyelid. Any residual oils can cause creasing and fading.
- Moisturize (Lightly): If your eyelids tend to be dry, a tiny amount of lightweight, non-greasy moisturizer can help, but ensure it’s fully absorbed.
- Prime: An excellent eyeshadow primer is non-negotiable for advanced eyeshadow techniques. It creates a smooth base, intensifies color payoff, and significantly extends wear time. Look for primers that address specific concerns like oiliness or discoloration.
- Set (Optional but Recommended): For oily lids or to create an even smoother canvas, lightly set your primer with a translucent powder or a neutral matte eyeshadow.
This meticulous preparation ensures that your intricate blending and layering will look pristine and stay put throughout the day or night.
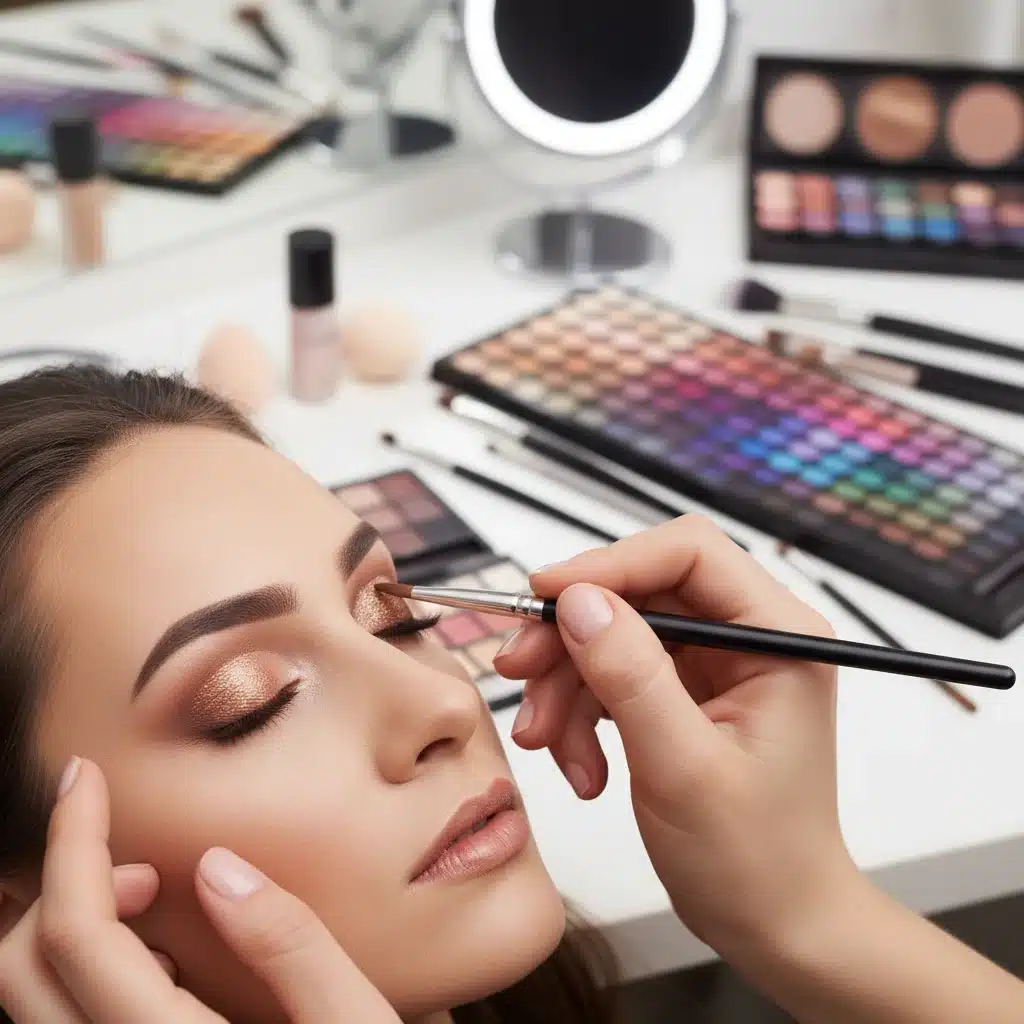
Mastering the Art of Blending and Layering
Blending is the cornerstone of any beautiful eyeshadow look, but advanced blending goes beyond simply softening edges. It involves creating seamless transitions, building depth, and achieving a diffused, airbrushed effect. Layering, on the other hand, is about building intensity and complexity.
Precision Blending Techniques
To truly master advanced eyeshadow techniques, you need a variety of blending brushes and an understanding of how to use them. Different brush shapes and densities serve different purposes.
- Fluffy Domed Brushes: Ideal for diffusing transition shades in the crease and softening harsh lines. Use light, circular motions.
- Tapered Blending Brushes: Perfect for precise blending in smaller areas, like the outer V or defining the crease.
- Pencil Brushes: Essential for smoking out the lash line or adding precise color in the inner corner or lower lash line.
- Flat Shader Brushes: Used for packing on intense color onto the lid.
The secret to seamless blending is to use a light hand and build color gradually. Start with the lightest shade and progressively add darker ones, blending each shade as you go. Avoid applying too much product at once, as it becomes harder to blend out.
The Power of Layering
Layering allows you to achieve depth, dimension, and customized color. It’s about combining different textures and finishes to create a multi-faceted look.
- Matte First, Shimmer Second: Generally, matte shades are used as a base or for defining the crease and outer V. Shimmers, satins, or metallics are then layered on top, usually on the lid or inner corner, to add pop and light.
- Cream Before Powder: For intense color payoff and longevity, apply a cream eyeshadow or an eyeshadow stick as a base before layering a matching powder shadow on top. This technique is excellent for creating vibrant, long-lasting looks.
- Wet Application: For extreme metallic or glitter payoff, lightly dampen your brush with setting spray before picking up shimmer or glitter shadows. This intensifies the pigment and minimizes fallout.
- Building Intensity: Don’t try to achieve full opacity with one layer. Apply thin layers, blending each one before adding more. This creates a softer, more professional gradient.
These layering strategies are fundamental to achieving the sophisticated looks associated with advanced eyeshadow techniques.
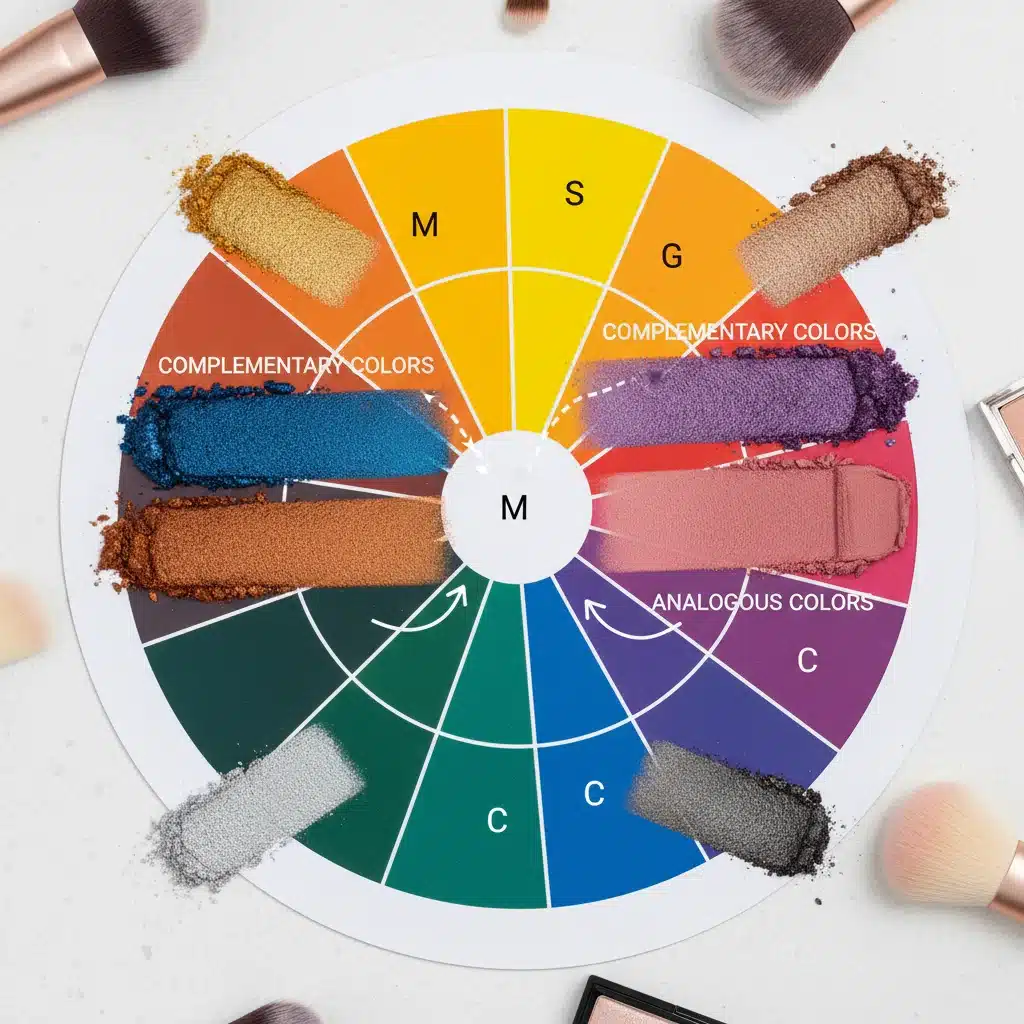
Color Theory for the Eyes: Beyond Matching
Understanding color theory is not just for painters; it’s a critical component of advanced eyeshadow techniques. It helps you choose shades that complement each other, enhance eye color, and create specific moods.
Complementary and Analogous Colors
Remember the color wheel from art class? It’s your best friend in makeup.
- Complementary Colors: These are colors opposite each other on the color wheel (e.g., blue and orange, purple and yellow, green and red). Using a complementary shade can make your eye color pop. For example, warm coppers and oranges make blue eyes appear bluer, while plums and purples enhance green eyes.
- Analogous Colors: These are colors next to each other on the color wheel (e.g., blue, blue-green, green). Using analogous colors creates a harmonious, blended look, often seen in monochromatic or gradient styles.
The Role of Undertones
Just like skin, eyeshadows have undertones (warm, cool, neutral). Matching the undertone of your eyeshadow to your skin’s undertone can create a more cohesive and flattering look. However, breaking this rule strategically can also create interesting contrasts.
- Warm Undertones: Golds, bronzes, peaches, and warm browns often look stunning.
- Cool Undertones: Silvers, greys, cool browns, blues, and purples tend to be more flattering.
- Neutral Undertones: Can pull off a wide range of both warm and cool shades.
Experimentation is key, but a basic understanding of color theory provides a solid framework for choosing and combining shades effectively, a true marker of advanced eyeshadow techniques.
Signature Advanced Eyeshadow Techniques for 2026
Now that we’ve covered the theoretical groundwork, let’s dive into some of the most sought-after and impactful advanced eyeshadow techniques for 2026.
The Cut Crease: Precision and Definition
The cut crease is a dramatic technique that creates a sharp, distinct line in the crease of the eye, separating the lid color from the transition shades. It’s fantastic for creating the illusion of a larger lid space and adding intense definition.
- Apply Transition Shades: Start by applying and blending your transition shades above your natural crease, extending them slightly upwards.
- Define the Crease: Using a small, flat brush and a full-coverage concealer or a cream eyeshadow base, carefully carve out a crisp line along your crease. Look straight ahead into the mirror to determine where the crease should be defined for your eye shape.
- Set the Cut Crease: Lightly set the carved-out area with a neutral matte eyeshadow or translucent powder to prevent creasing.
- Apply Lid Color: Pack a vibrant or shimmery eyeshadow onto the newly defined lid space. The sharp edge of the cut crease will make this color pop.
- Blend Edges (Optional): You can either leave the top edge of the cut crease sharp or softly blend a darker shade along the very top edge to create a soft gradient.
This technique requires patience and a steady hand, but the results are incredibly striking and instantly elevate your look to professional status.
The Halo Eye: Light in the Center
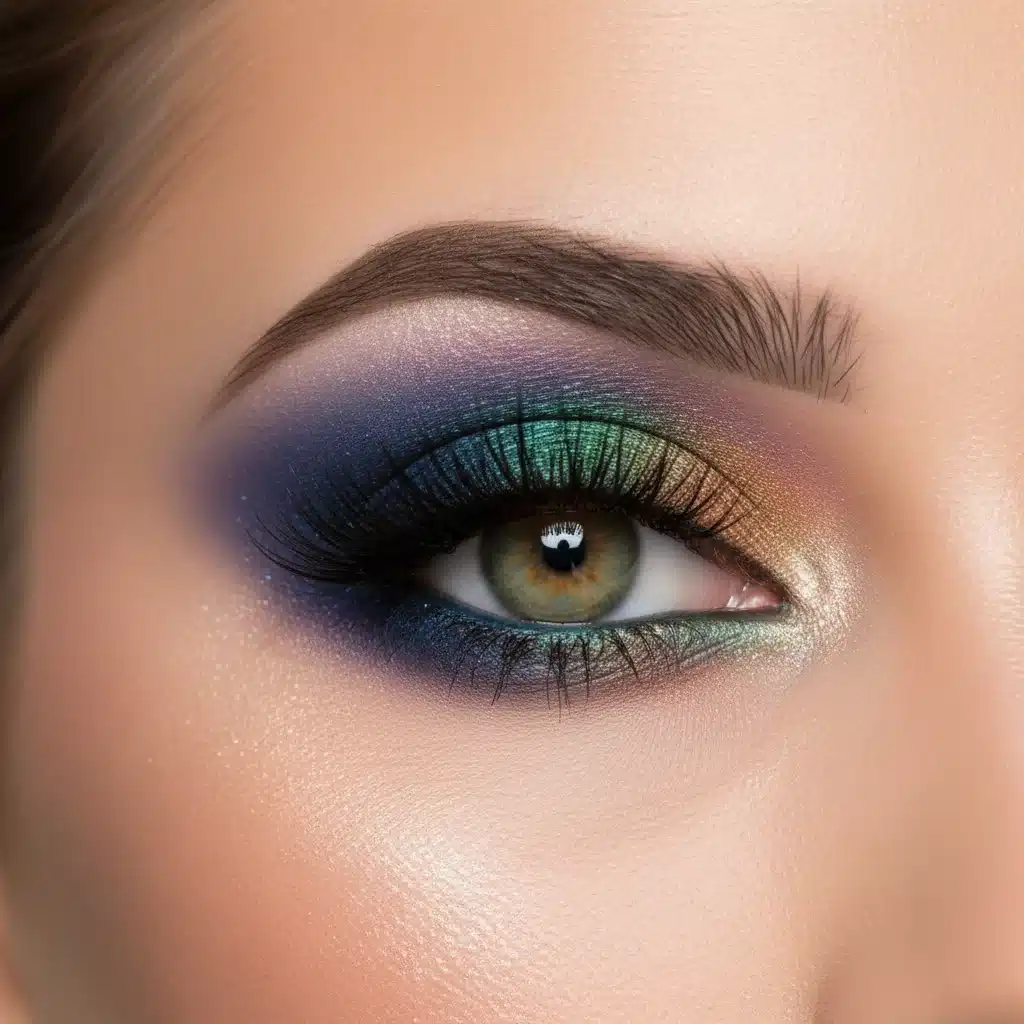
Also known as a ‘spotlight eye,’ the halo eye creates a captivating, dimensional effect by placing a lighter, often shimmery shade in the center of the lid, flanked by darker shades on either side. This technique makes the eyes appear larger and more open.
- Apply Base Shades: Start by applying a medium to dark matte shade to the inner and outer thirds of your eyelid, leaving the center bare. Blend well into the crease and outer V.
- Build Depth: Deepen the inner and outer corners with a darker matte shade, ensuring a seamless blend.
- Apply Center Shade: Using a flat shader brush (or your fingertip for extra intensity), press a bright, shimmery, or metallic shade onto the center of your eyelid, directly over the bare spot.
- Blend Edges: Lightly blend the edges of the center shimmer into the surrounding matte shades to create a soft, gradient halo effect.
- Lower Lash Line: Replicate the same pattern on the lower lash line for a cohesive look – dark on the inner and outer thirds, shimmer in the center.
The halo eye is a beautiful way to add drama and brightness, making it a favorite among advanced eyeshadow techniques.
Graphic Liner and Eyeshadow Combinations
2026 sees a strong resurgence of graphic liner, but with an artistic twist. Instead of just a standalone liner, combine it with eyeshadow to create intricate designs and bold statements.
- Floating Crease with Shadow: After applying a soft eyeshadow look, use a liquid or gel liner to draw a line just above your natural crease, creating a ‘floating’ effect. You can then add a pop of color eyeshadow underneath this line.
- Negative Space Liner: Create shapes or lines with eyeshadow, then use liner to define the negative space around them.
- Dual-Toned Wings: Use one color of eyeshadow for your winged liner, then add a second, contrasting color with a liquid liner directly above or below it.
- Liner as a Shadow Base: Use a creamy pencil liner in a vibrant shade as a base, then smudge it out and layer a matching or complementary powder eyeshadow on top for an intense, long-lasting color.
These combinations push the boundaries of traditional eye makeup, allowing for immense creativity and personal expression.
Faux Lower Lash Line: The Illusion of Fuller Lashes
This subtle yet effective technique creates the illusion of a fuller, more defined lower lash line without heavy eyeliner.
- Choose a Soft Shade: Select a matte eyeshadow shade that is slightly darker than your skin tone but not too harsh (e.g., a soft brown, grey, or taupe).
- Use a Small, Flat Brush: With a very thin, flat, or angled brush, apply the shadow directly underneath your lower lash line, mimicking the natural shadow cast by your lashes.
- Connect to Upper Lash Line: Gently connect this line to the outer corner of your upper lash line, creating a soft, almost imperceptible lift.
- Smudge (Optional): For an even softer effect, lightly smudge the line with a clean pencil brush.
This technique adds depth and definition without looking heavy, making your eyes appear more open and awake – a clever application of advanced eyeshadow techniques.
Texture Play and Finishing Touches
Beyond color and shape, the interplay of textures adds another layer of sophistication to advanced eyeshadow techniques. Combining mattes, shimmers, glitters, and metallics can create dynamic and multi-dimensional looks.
Mixing Textures for Dimension
- Matte for Structure, Shimmer for Light: Use matte shades to build the structure of your eye look (crease, outer V) and shimmers or metallics on the lid, inner corner, or brow bone to catch the light and add dimension.
- Glitter Toppers: For a dazzling effect, layer a fine glitter topper over a complementary eyeshadow shade. Use a glitter primer to ensure adhesion and minimize fallout.
- Satin Finishes: Satin shadows offer a subtle sheen that can be used for a softer, more sophisticated highlight than a full-on shimmer.
Strategic Highlighting and Shadowing
Just like contouring for the face, strategic highlighting and shadowing on the eyes can alter their appearance.
- Brow Bone Highlight: A matte or subtle satin highlight under the arch of the brow lifts and brightens the eye area. Avoid overly shimmery highlights if you have textured skin on the brow bone.
- Inner Corner Pop: A bright, shimmery shade in the inner corner of the eye instantly brightens and opens up the eyes. This is a universally flattering technique.
- Lower Lash Line Shadow: Applying a darker matte shadow along the outer half of the lower lash line adds depth and can balance a dramatic upper lid.
Lashes and Brows: The Frame of Your Art
No advanced eyeshadow look is complete without attention to lashes and brows. They frame your eye makeup and can make or break the overall effect.
- Lashes: Whether you opt for voluminous mascara, individual lashes, or a full strip, lashes add the final touch of drama and definition. Consider the style of your eyeshadow when choosing lashes – a dramatic smoky eye might call for fuller lashes, while a subtle look might pair better with natural-looking individuals.
- Brows: Well-groomed and defined brows are essential. They provide a clean, polished frame for your intricate eyeshadow work. Fill in sparse areas, define your arch, and set them in place with a brow gel.
These finishing touches are critical for a truly professional and cohesive look, ensuring that your advanced eyeshadow techniques shine.
Troubleshooting Common Advanced Eyeshadow Challenges
Even with advanced skills, challenges can arise. Knowing how to troubleshoot them is part of mastering advanced eyeshadow techniques.
Creasing
Creasing is often due to oily eyelids or insufficient primer. Ensure your eyelids are clean, use a high-quality primer, and set it lightly with powder. If you’re using cream shadows, set them with a matching powder shadow.
Patchy Application
Patchiness usually stems from applying too much product at once or not blending thoroughly. Always apply thin layers and blend each layer before adding more. Ensure your brushes are clean and free of old product build-up.
Fallout
Glitter and shimmer shadows are notorious for fallout. To minimize this, apply your eye makeup before your face makeup (foundation, concealer). Use a glitter primer for glitters, and for shimmers, try dampening your brush or pressing the product onto the lid rather than sweeping it. You can also hold a tissue under your eye to catch any fallout.
Muddiness
Muddiness occurs when colors blend into an indistinct mess, often from using too many shades without proper blending or using colors that don’t harmonize. Stick to a cohesive color palette, blend each shade carefully, and use clean blending brushes between colors.
Lack of Intensity
If your shadows aren’t as vibrant as you’d like, ensure you’re using a good primer. Also, try packing on the color with a flat shader brush rather than sweeping, or use a cream base underneath for extra pop. Dampening your brush for shimmers can also boost intensity.
The Future of Eye Artistry: 2026 Trends
As we look to 2026, advanced eyeshadow techniques will continue to evolve, blending artistry with wearability. Here are some anticipated trends:
- Soft Grunge: A more refined take on grunge, featuring smoky eyes with diffused edges, hints of metallic, and a focus on deep, rich jewel tones.
- Artistic Pastels: Moving beyond simple pastel washes, 2026 will see intricate designs and color blocking with muted, sophisticated pastel shades.
- Deconstructed Cat Eye: The classic cat eye gets an update with fragmented lines, negative space, and unexpected placements, often combined with subtle shadow work.
- Dimensional Monochromatic: Using varying textures and finishes within a single color family to create depth and interest, for example, a matte blue crease with a metallic blue lid and a glitter blue inner corner.
- Inner Corner Focus: Hyper-detailed inner corner highlights and designs using bright, contrasting colors or glitters will be a key focal point.
Staying abreast of these trends ensures your advanced eyeshadow techniques remain fresh and relevant.
Conclusion: Your Journey to Pro-Level Eyes
Mastering advanced eyeshadow techniques is a journey that combines knowledge, practice, and creativity. By understanding eye shapes, perfecting your blending and layering, embracing color theory, and experimenting with signature techniques like the cut crease and halo eye, you can transform your eye makeup application from good to exceptional.
Remember, practice makes perfect. Don’t be afraid to experiment, make mistakes, and learn from them. The beauty world is your playground, and with these advanced techniques, you have the tools to create stunning, professional-level eye looks that will turn heads in 2026 and beyond. So grab your brushes, open your palettes, and let your artistic vision come to life!


