Winged Eyeliner: The Ultimate Guide to Perfect Wings Every Time
The Ultimate Guide to Winged Eyeliner provides a comprehensive walkthrough for achieving flawless winged eyeliner, covering essential tools, techniques for different eye shapes, and tips for long-lasting wear.
Achieving the perfect winged eyeliner can feel like an impossible feat. But with the right techniques and a little practice, you can master this iconic look! This The Ultimate Guide to Winged Eyeliner will provide you with the knowledge and tools to create flawless wings every time.
Step-by-Step: Your Eyeliner Toolkit
Before diving into the application process, it’s crucial to gather the right tools. Having the right tools will make the entire process smoother and more efficient, setting you up for winged eyeliner success.
Essential Eyeliner Brushes
The brush is the key to precision. Opt for a thin, angled brush to create sharp lines. Different eyeliner brushes can help you master your final style.
- Angled Brush: Ideal for creating sharp, defined wings.
- Fine-Tip Brush: Perfect for precise and detailed work.
- Flat Brush: Great for smudging and creating a softer look.
Experiment with different brushes to find the one that feels most comfortable and gives you the desired level of control.

Choosing the Right Eyeliner
Gel, liquid, or pencil? The choice is yours! Each type offers a unique finish and application style.
- Gel Eyeliner: Known for its long-lasting formula and rich pigmentation
- Liquid Eyeliner: Provides a crisp, clean line; choose waterproof for lasting power.
- Pencil Eyeliner: Easier to control, perfect for beginners; smudge for a softer look.
Pick a formula that suits your skill level, preference, and desired effect. Test different products to discover a long-lasting eyeliner.
In conclusion, perfecting your winged eyeliner look is easier with the right tools. By selecting high-quality brushes that feel right in your hand and an eyeliner formula that suits your skill level and desired outcome, you’re setting the stage for flawless application and stunning results every time.
Prep Your Lids: Priming and Base
Preparing your eyelids is a crucial step in achieving long-lasting and flawless winged eyeliner. A well-prepped lid ensures that your eyeliner glides on smoothly, stays in place, and maintains its vibrancy throughout the day.
Why Priming Matters
Eyelid primer creates a smooth canvas, prevents creasing, and enhances eyeliner longevity. It also helps to even out skin tone and provides a base for the eyeliner to adhere to.
Application Techniques
Apply a thin layer of eyelid primer from your lash line to your brow bone. Use your fingertip or a small brush to blend it evenly. Wait a few seconds for the primer to set before applying any other products.
- Choose the Right Primer: Select a primer specifically designed for eyelids; avoid using face primer.
- Apply a Thin Layer: Too much primer can cause creasing; a little goes a long way.
- Set the Primer (Optional): Use a translucent powder to set the primer for added longevity.
Creating a smooth base ensures your winged eyeliner lasts longer and looks its best. When choosing your primer, think about your skin tone — if you have oily skin, your primer should be oil-absorbing.
To conclude, priming and preparing your eyelids are not just additional steps but essential components to achieving a professional, long-lasting winged eyeliner look. Incorporating these techniques into your makeup routine will ensure that your eyeliner stays flawless and vibrant all day, enhancing your overall eye makeup.
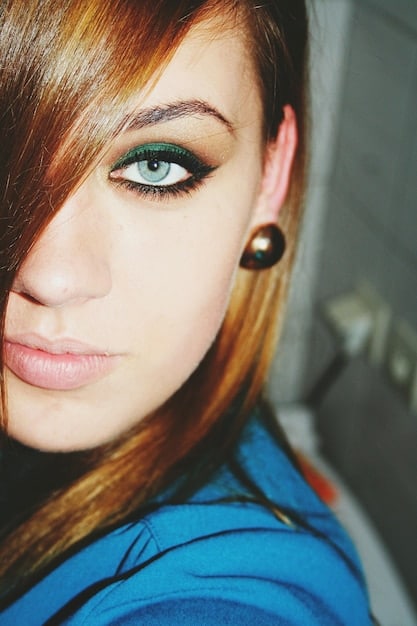
Mastering the Flick: Step-by-Step Application
Now, let’s get to the fun part – creating the perfect flick. With a steady hand and a few guidelines, you’ll be rocking a killer wing in no time.
Finding Your Angle
The angle of your wing should follow the natural curve of your lower lash line for a lifted look. Extend the line towards the end of your eyebrow for the proper projection.
Begin by drawing a thin line extending outward from the outer corner of your eye, angling it upwards towards the tail of your eyebrow.

Connecting the Lines
Create the top line of the wing by connecting the tip of the flick to the upper lash line. Fill in the shape for a solid, defined wing.
Once you have the outline of your wing, carefully fill it in with eyeliner. Ensure that the filled-in area is smooth and consistent, with no gaps or uneven spots.
Tips for Achieving Symmetry
Achieving symmetrical wings is a common challenge, but it does not have to be impossible. Start with a thin line on both eyes, then gradually build up the thickness to ensure evenness.
- Use Dot-to-Dot Method: Place dots along the lash line as a guide, then connect them.
- Work in Front of a Mirror: Keep a mirror at eye level to maintain symmetry.
- Don’t Be Afraid to Erase: Use a makeup remover to correct mistakes.
By following these strategies, you can turn the difficulty of perfecting symmetrical wings into an easy job. Just commit to consistent practice.
In summary, by mastering the flick, you are mastering the art of the winged eyeliner. The trick is to start simple — take your time, go dot-to-dot, and follow the natural lines of your eye.
Tailoring Wings to Your Eye Shape
The perfect wing isn’t one-size-fits-all. Different eye shapes require specific techniques to enhance their natural beauty.
Almond Eyes
Almond eyes are versatile and can pull off almost any wing style. Experiment with bold and dramatic wings for a striking look.
For almond eyes, a classic winged eyeliner look is an excellent choice. This involves creating a wing that extends outward and slightly upward, following the natural curve of the eye.
Since almond eyes have a naturally balanced shape, you can play with the thickness and length of the wing to achieve different effects. A thicker wing will make the eyes appear more dramatic, while a thinner wing will give a more subtle and refined look.
Hooded Eyes
Hooded eyes require a floating or bat wing to avoid disappearing into the crease. Keep the wing thin and elongated.
With hooded eyes, the key is to create a wing that is visible even when the eyes are open. This can be achieved by using the “bat wing” or “floating” technique.
- Extend and Thicken: After outlining it, extend the wing slightly beyond the crease line.
- Experiment: See what kind of wing works best for your eye.
With practice, you’ll find the perfect wing style that accentuates your unique eye shape, making your eyes the focal point of your makeup look. The most important thing is to find a way to keep your wing visible at all times.
Round Eyes
Round eyes benefit from a wing that extends horizontally to elongate the shape. Avoid wings that are too upturned, as they can make the eyes appear even rounder.
Creating a wing that extends horizontally helps to elongate round eyes, giving them a more almond-like appearance.
The goal is to create a wing that adds length and definition to the eyes without making them appear wider or more circular. Experiment with different angles and thicknesses until you find a wing shape that complements your features.
In tailoring your wing to your eye shape, you are highlighting your natural beauty. The most important thing when experimenting with looks is to keep practicing and to have fun!
Troubleshooting Common Eyeliner Mistakes
We’ve all been there – uneven wings, smudges, and wobbly lines. But don’t worry; these common mistakes are easily fixable. Here’s how to troubleshoot your way to winged eyeliner perfection.
Uneven Wings Remedies
Use cotton swabs dipped in makeup remover to clean up and even out the wings. Remember, patience is key– you want to be sure to take your time.
Begin by dipping a cotton swab into the makeup remover. Gently swipe along the edges of the eyeliner to refine the shape and create a cleaner, more defined wing. Use small, controlled strokes to avoid smudging the surrounding makeup.
- Clean Up with Concealer: Sharpen the edges of the wing with a concealer brush.
- Take Breaks: If you’re struggling with symmetry, take a break and come back with fresh eyes.
Smudging Solutions
Set your eyeliner with a translucent powder or eyeshadow to prevent smudging. Also, choose waterproof formulas– these are designed to withstand moisture.
Setting the eyeliner with powder or eyeshadow helps to absorb excess oil and moisture, preventing smudging and ensuring that the eyeliner stays in place throughout the day.
Wobbly Lines
Rest your elbow on a stable surface to steady your hand. Use short, controlled strokes to create a smooth, even line.
Create a smooth, even line by using short, controlled strokes can make the entire process much easier. Short strokes decrease the surface of your hand that is in contact with your eyelid.
Ultimately, the best way to conquer these difficulties is to build the steady application of lines and strokes into your muscle memory through practice.
Long-Lasting Wings: How to Make It Stay
You’ve nailed the wing, now it’s time to make it last all day (or night) long. Here’s how to ensure your winged eyeliner stays put, no matter where life takes you.
Setting with Powder
After applying your eyeliner, gently dab a translucent powder over it with a small brush. This will set the eyeliner and prevent it from smudging or fading.
Translucent powder can ensure that your winged look remains intact and fresh-looking for hours on end. The steps are relatively easy, and this will quickly become an important part of your makeup routine.
Waterproof Formulas
Invest in waterproof or smudge-proof eyeliners to withstand humidity, sweat, and tears. Check reviews, as these can be a lifesaver, telling you which products function the best.
Waterproof eyeliner formulas typically contain ingredients that create a barrier against moisture, preventing the eyeliner from dissolving or transferring onto the skin. These formulations often include polymers, waxes, and silicones that form a flexible, water-resistant film upon application.
- Test Before Use: Always test the product on a small area of your skin to ensure you’re not allergic.
- Read Reviews: Pay attention to what other makeup users say about certain products.
While there are some possible downsides to investing in waterproof formulas, the upsides heavily outweigh them in a variety of situations. You can go out feeling confident.
Eyeliner Sealer
Apply an eyeliner sealer over your eyeliner to lock it in place. This will create a barrier that protects the eyeliner from moisture and friction.
Eyeliner sealers are designed to create a protective barrier over eyeliner, preventing it from smudging, fading, or transferring onto the skin. These sealers typically come in liquid or gel form and are applied over the eyeliner once it has dried.
Once applied, the formulation sets and creates a flexible, transparent film that locks the eyeliner in place, ensuring it stays put for hours. This is an important consideration when investing in an eyeliner sealer.
| Key Point | Brief Description |
|---|---|
| 🧽 Clean Brushes | A clean, functional brush equals a precise line. |
| 💧 Waterproof Eyeliner | Prevents running due to sweat and moisture. |
| ✨ Sealant | Protects applied wing from everyday circumstances. |
| 📐 Tailor to Eye Shape | Enhance what you already have by tailoring to what looks best on you. |
FAQ
▼
To create winged eyeliner, you’ll need an eyeliner (liquid, gel, or pencil), a thin eyeliner brush (angled or fine-tip), makeup remover, and cotton swabs for clean-up.
▼
For oily skin, opt for waterproof or smudge-proof formulas. If you have dry skin, choose creamy eyeliners that won’t dry out your lids. Test products before applying.
▼
To prevent smudging, use an eyelid primer before applying eyeliner. Set the eyeliner with translucent powder and choose waterproof or smudge-proof formulas of eyeliners and sealants.
▼
Start with a thin line on both eyes, then gradually build up the thickness. Use the dot-to-dot method and take breaks to maintain symmetry. Sharpen the wing edges with concealer.
▼
Use a gentle makeup remover specifically designed for eyes. Hold a cotton pad soaked in remover over your eyelid for a few seconds before gently wiping away the eyeliner.
Conclusion
Mastering the winged eyeliner look takes time and practice, but the results are well worth the effort. With the right tools, techniques, and a little patience, you can achieve perfect wings every time. So go ahead, experiment with different styles, and unleash your inner makeup artist!


