How to Contour Your Nose: A Step-by-Step Guide to Slimming and Defining

Contouring your nose with makeup can create the illusion of a slimmer, more defined shape by using light and shadow to enhance and reshape its appearance.
Do you want to refine the shape of your nose without surgery? How to contour your nose using makeup is a non-invasive technique that allows you to slim, define, and reshape your nose with just a few simple steps.
Why Contour Your Nose? Understanding the Basics
Contouring the nose is a popular makeup technique that uses light and shadow to alter its appearance. It can provide a more refined and balanced look, enhancing your overall facial harmony. By strategically applying darker shades to create shadows and lighter shades to highlight, you can reshape and redefine your nose without permanent changes.
The Power of Light and Shadow
The core principle behind contouring is manipulating how light interacts with your face. Darker shades (contour) recede areas, making them appear smaller or further away. Lighter shades (highlight) bring areas forward, emphasizing them and reflecting light. When used correctly, this creates depth and dimension, which contours the nose.
Benefits of Nose Contouring
Nose contouring offers several benefits, including:
- Creating a slimmer nose
- Defining the bridge
- Shortening the length
- Correcting asymmetry
- Enhancing overall facial symmetry
By skillfully using contouring techniques, you can address specific concerns and achieve a more balanced and attractive look.
Ultimately, whether you simply want to experiment or achieve a specific look, understanding these basics is the first step in mastering nose contouring.
Essential Tools and Products for Nose Contouring
Achieving a flawless nose contour requires having the right tools and products. The quality of your makeup and the precision of your tools can significantly influence the final outcome. Proper preparation ensures a smooth application and a natural-looking finish.
Contour Shades
Choosing the right contour shade is crucial for creating realistic shadows. Look for matte contour powders or creams that are a few shades darker than your natural skin tone. Avoid shades with shimmer or excessive warmth, as these can appear unnatural. Cool-toned shades generally work best as they mimic natural shadows.
Highlight Shades
Highlight shades should be lighter than your skin tone and can be either matte or subtly shimmery. Matte highlights are excellent for creating dimension without drawing too much attention, while subtle shimmer can add a soft glow to the bridge of your nose. Consider the finish and undertone of your skin when selecting a highlighter.
Brushes
The right brushes make all the difference in blending your contour and highlight seamlessly. Here are some essential brushes for nose contouring:
- Small, angled brush: Ideal for precise contour placement along the sides of the nose.
- Small, fluffy brush: Perfect for blending the contour for a natural finish.
- Tapered highlighting brush: Designed for applying highlight precisely down the bridge of the nose.
Investing in high-quality brushes ensures a smoother, more controlled application.
Step-by-Step Guide: How to Contour Your Nose
Now that you have your tools and products ready, let’s dive into the step-by-step process of contouring your nose. This guide will walk you through the application techniques to help you achieve a sculpted and defined look. Practice and patience are key to mastering this technique.
Step 1: Preparing Your Skin
Start with a clean, moisturized face. Apply your foundation and concealer as usual to create an even base. Setting your base with a light powder will also help the contour and highlight blend more smoothly.
Step 2: Applying Contour
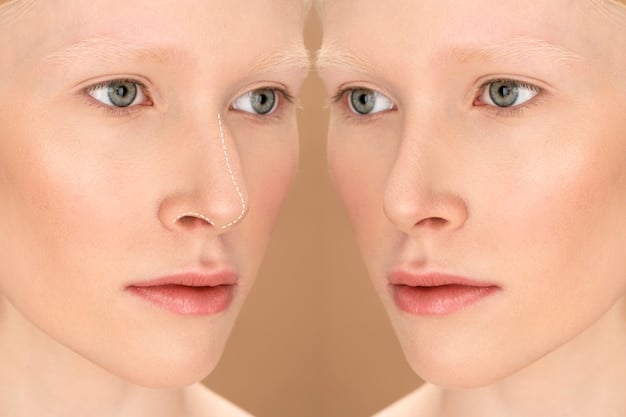
Using a small, angled brush, apply the contour shade down the sides of your nose, starting from the inner corner of your eyebrow and extending to the tip of your nose. The closer you place the contour lines together, the slimmer your nose will appear. For a shorter nose, avoid bringing the contour all the way down to the tip.
Step 3: Blending the Contour
Use a small, fluffy brush to blend the contour lines. Blend upwards and outwards to soften any harsh lines and create a seamless transition between the contour and your foundation. Take your time and blend thoroughly to avoid a muddy appearance.
Step 4: Applying Highlight
With a tapered highlighting brush, apply the highlight shade down the center of your nose, starting from the bridge and extending to the tip. This will draw light to the center of your nose, making it appear more prominent and defined. Be precise with your application to avoid widening the nose.
Step 5: Blending the Highlight
Gently blend the edges of the highlight with a clean brush or your finger. This will ensure that the highlight seamlessly merges with your skin and the surrounding contour. Avoid over-blending, as this can minimize the effect of the contour and highlight.
Step 6: Setting the Contour and Highlight
To ensure your contour and highlight last all day, set them with a light dusting of translucent powder. This will help to prevent creasing and fading, keeping your nose looking sculpted and defined.
Contouring is a gradual process. Follow these steps, and you’ll be well on your way to a perfectly contoured nose.
Contouring for Different Nose Shapes
Different nose shapes require different contouring techniques. Understanding your nose shape and tailoring your application accordingly can help you achieve a more natural and flattering result. Tailoring your contouring technique is important in bringing your best profile forward.
Wide Nose
For a wide nose, focus on creating narrow shadows along the sides of your nose. Apply the contour shade close to the center of your nose to make it appear slimmer. Highlight the bridge of your nose to draw attention to the center and further enhance the slimming effect.
Long Nose
If you have a long nose, apply the contour shade to the tip of your nose to create the illusion of a shorter length. Avoid highlighting the entire length of your nose, as this can make it appear even longer. Instead, focus the highlight on the bridge of your nose to balance the proportions.
Crooked Nose
To correct a crooked nose, apply the contour shade to the side that protrudes more, creating a shadow that straightens the appearance of your nose. Highlight the opposite side to balance the asymmetry. Blend carefully to ensure a seamless transition between the contour and highlight.
Flat Nose
Contouring can aid in defining the nose if it’s flat. Darken the sides from the inner brow down to the nostrils. Be sure to blend the shade for a seamless, natural look. Add dimension with a vertical highlight on the bridge of your nose.
By understanding the nuances of your nose shape, you can customize your contouring technique to enhance your unique features.
Common Mistakes to Avoid When Contouring Your Nose
While nose contouring can be a transformative technique, there are several common mistakes that can hinder your results. Avoiding these pitfalls will help you achieve a more natural and polished finish. Knowing what *not* to do can be just as important as knowing what *to* do.
Using the Wrong Shade
One of the most common mistakes is using a contour shade that is too warm or too dark. Warm-toned contour shades can appear orange or muddy, while shades that are too dark can look harsh and unnatural. Always opt for cool-toned shades that are a few shades darker than your skin tone.
Over-Blending
While blending is essential for creating a seamless finish, over-blending can minimize the effect of the contour and highlight. Be sure to blend the edges of the contour and highlight, but avoid blending them together completely. You want to maintain the contrast between light and shadow to create dimension.
Applying Too Much Product
Using too much product can result in a heavy, unnatural look. Start with a small amount of contour and highlight, and gradually build up the intensity as needed. It’s always easier to add more product than to remove it.
Ignoring Your Nose Shape
Failing to consider your nose shape can lead to unflattering results. Tailor your contouring technique to your unique features to achieve a more balanced and harmonious appearance.
Not Setting Your Makeup
Skipping the setting step can cause your contour and highlight to fade or crease throughout the day. Always set your makeup with a light dusting of translucent powder to ensure it lasts.
By steering clear of these common mistakes, you can elevate your nose contouring skills and achieve a flawless, natural-looking result.
Advanced Nose Contouring Techniques
Once you’ve mastered the basics of nose contouring, you can explore more advanced techniques to enhance your results. These techniques involve more precise application and blending, allowing you to customize your contour to your unique features even further. Experimenting with shadows and highlights can dramatically alter how you are perceived.
Using Cream Contour
Cream contour products offer a richer, more blendable formula compared to powder contours. Apply cream contour with a small, dense brush or your fingertips, and blend seamlessly into your skin. Cream contours are ideal for creating a natural, skin-like finish.
Contouring with Bronzer
Bronzer can be used to add warmth and dimension to your nose contour. Choose a matte bronzer that is a few shades darker than your skin tone and apply it along the sides of your nose, blending well. Bronzer is especially useful for creating a sun-kissed, natural-looking contour.
Using Multiple Shades of Contour
To create a more sculpted and defined nose, use multiple shades of contour. Apply a deeper shade along the sides of your nose to create shadows, and a lighter shade to blend out the edges. This technique adds depth and dimension to your contour, resulting in a more refined appearance.
Highlighting with Iridescent Powders
Iridescent powders can add a luminous glow to your nose highlight. Apply a small amount of iridescent powder to the bridge of your nose, blending well to avoid a harsh line. This technique is perfect for special occasions when you want to add extra radiance to your look.
Advanced techniques can take your nose contouring skills to the next level. With creativity and experimentation, these skills can bring amazing results.
| Key Point | Brief Description |
|---|---|
| 👃 Contour Shade | Use a matte, cool-toned shade a few shades darker than your skin. |
| ✨ Highlight Shade | Apply a lighter shade with a matte or subtle shimmer to the bridge. |
| 🖌️ Essential Brushes | Use small, angled, and fluffy brushes for precise application and blending. |
| 📏 Nose Shape | Adjust contour based on your nose shape: wide, long, crooked, or flat. |
Frequently Asked Questions
▼
Nose contouring involves using makeup to reshape the nose. By applying darker shades to areas you want to minimize and lighter shades to highlight, you create the illusion of a different nose shape.
▼
Use a matte contour powder or cream that is a few shades darker than your skin tone. For highlights, a shade lighter than your skin tone in matte or shimmer works well. Blend with makeup blender or brush.
▼
To make your nose look thinner, apply contour shades down the sides of your nose, close to the center. This creates shadows that give the illusion of a slimmer nose. Highlight with a makeup blender for a streamlined look.
▼
Key mistakes include using the wrong shade, over-blending, and applying too much product. Pick complementary colors and blend using small, angled, and fluffy brushes. Use less makeup to contour with a natural outcome.
▼
Apply contour shade to the side that protrudes more, creating a shadow. Highlight the opposite side to balance symmetry. Proper blending helps create a seamless transition, for a face-balanced finish.
Conclusion
Mastering how to contour your nose can significantly enhance your makeup skills, allowing you to reshape and define your nose without surgery. With the right tools, techniques, and a bit of practice, you can achieve a naturally sculpted look that complements your overall features.


