Mastering Brow Lamination at Home: A 2026 Step-by-Step Makeup Tutorial
Mastering Brow Lamination at Home: A 2026 Step-by-Step Makeup Tutorial
In the ever-evolving world of beauty, perfectly sculpted and defined eyebrows remain a timeless focal point. As we step into 2026, one trend continues to dominate the brow scene: brow lamination. This revolutionary treatment offers a semi-permanent solution to achieve fluffy, full, and perfectly groomed brows, making them appear thicker and more uniform. While professional brow lamination services are widely available, the desire for convenience and cost-effectiveness has led to a surge in popularity for brow lamination at home. If you’ve been dreaming of waking up with effortlessly styled brows, this comprehensive guide is your ultimate resource. We’ll walk you through everything you need to know to master DIY brow lamination, from selecting the right products to crucial aftercare, ensuring stunning, salon-quality results right from your own bathroom.
Brow lamination is more than just a passing trend; it’s a game-changer for anyone looking to enhance their natural brows without the commitment of microblading or daily styling. By redirecting and setting the brow hairs into a desired shape, it creates an illusion of volume and fullness, taming unruly hairs and filling in sparse areas. The result is a sleek, polished look that can last for several weeks. This article will demystify the process, providing a detailed, step-by-step tutorial tailored for 2026, incorporating the latest tips and product recommendations to help you achieve flawless brow lamination at home.
What is Brow Lamination and Why Do It at Home?
Brow lamination is essentially a perm for your eyebrows. It involves a chemical process that breaks down the bonds in your brow hairs, allowing them to be restructured into a new, uniform shape. Once reshaped, a setting solution is applied to lock them into place, creating a fuller, brushed-up aesthetic. The final step typically involves a nourishing oil to replenish moisture and keep the hairs healthy. This treatment is ideal for those with unruly brows, sparse areas, or anyone desiring a more defined and polished look without the need for daily brow gel or pencil.
The allure of performing brow lamination at home lies in several key advantages:
- Cost-Effectiveness: Professional brow lamination can be quite expensive, with prices ranging significantly depending on the salon and location. A high-quality at-home kit, while an initial investment, can be used for multiple applications, saving you a considerable amount in the long run.
- Convenience: No appointments, no travel time. You can perform the treatment whenever it suits your schedule, whether it’s a quiet Sunday afternoon or a quick beauty session before an event.
- Control: Doing it yourself gives you complete control over the shape and intensity of your lamination. You can customize the look to perfectly suit your face and preferences.
- Privacy: For those who prefer to maintain their beauty routines in private, at-home treatments offer a comfortable and personal experience.
However, it’s crucial to approach brow lamination at home with caution and a thorough understanding of the process. Improper application can lead to over-processing, damage to your brow hairs, or skin irritation. This guide aims to equip you with the knowledge and confidence to achieve beautiful results safely and effectively.
Choosing the Right Brow Lamination Kit for 2026
The market for at-home brow lamination kits has expanded significantly, with new and improved formulations constantly emerging. In 2026, look for kits that prioritize gentle yet effective ingredients, clear instructions, and include all necessary tools. Here’s what to consider when selecting your kit:
- Ingredients: Opt for kits that use high-quality, gentle perming and setting solutions. Many modern kits feature nourishing ingredients like keratin, collagen, or vitamin E to minimize damage and promote healthy hair growth. Avoid kits with harsh chemicals that could irritate your skin or over-process your brows.
- Completeness: A good kit should include perm solution, setting lotion, nourishing oil or serum, brow adhesive (glue), spoolie brushes, and applicators. Some even come with plastic wrap or cotton pads, which are essential for the process.
- Brand Reputation and Reviews: Research reputable brands known for their beauty products. Read customer reviews and watch video tutorials to gauge the effectiveness and ease of use of different kits.
- Shelf Life: Check the expiration dates of the products. Using expired solutions can lead to ineffective results or adverse reactions.
- Allergy Test: Always, always perform a patch test 24-48 hours before full application, even if you’ve used the brand before. This is crucial to prevent allergic reactions.
Many kits are now designed for multiple uses, offering excellent value. Investing in a slightly more expensive, high-quality kit is often worth it for better results and reduced risk of damage. Remember, your brows are a prominent feature, so treat them with care!
Pre-Lamination Preparation: The Foundation for Flawless Brows
Proper preparation is key to successful brow lamination at home. Don’t skip these crucial steps:
- Patch Test: As mentioned, apply a tiny amount of each solution (perm, setting, glue) to a discreet area of your skin, like behind your ear or on your inner arm. Wait 24-48 hours. If there’s any redness, itching, or swelling, do not proceed.
- Cleanse Your Brows: Thoroughly clean your eyebrows to remove any makeup, oils, or residue. Use a gentle, oil-free cleanser. Ensure your brows are completely dry before starting.
- Trim and Tidy (Optional): If you have exceptionally long or unruly brow hairs, you can carefully trim them slightly to an even length. However, be conservative; over-trimming can negatively impact the lamination effect. Pluck any stray hairs outside your desired brow shape.
- Protect Your Skin: Apply a thin layer of petroleum jelly or a barrier cream around your brows, avoiding the brow hairs themselves. This will protect the delicate skin from the chemical solutions.
- Gather Your Tools: Lay out everything you’ll need: your lamination kit, cotton pads, Q-tips, a timer, and a small piece of plastic wrap (if not included in the kit).
Taking the time for these preparatory steps will not only ensure a safer application but also contribute significantly to the overall success and longevity of your brow lamination at home.
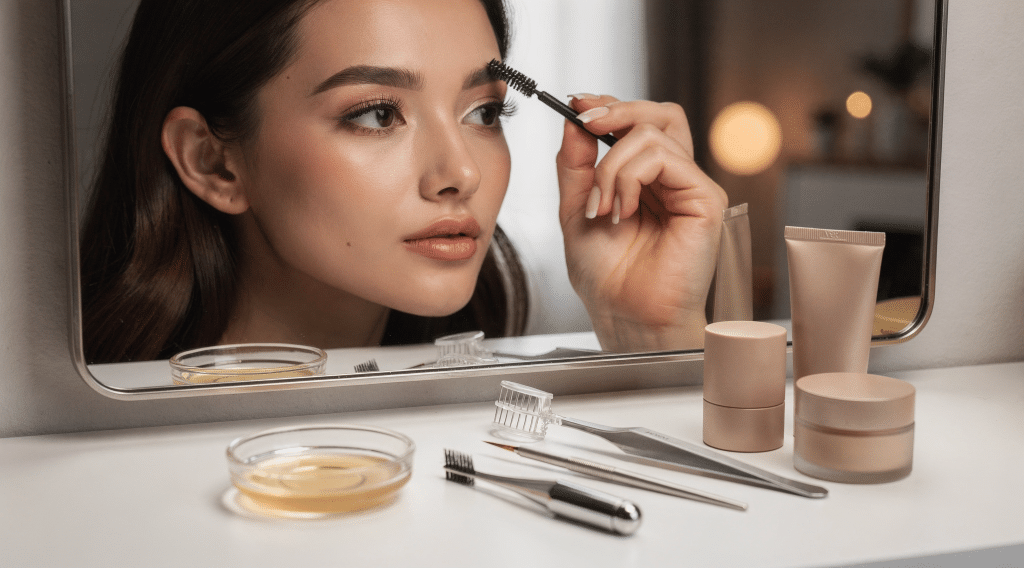
Step-by-Step Guide to At-Home Brow Lamination (2026 Edition)
Now for the main event! Follow these steps carefully for optimal results. Remember to work on one brow at a time to maintain control.
Step 1: Apply Brow Adhesive (Glue)
- Using a clean spoolie brush or the applicator provided, apply a thin layer of the brow adhesive (glue) to your entire brow, ensuring all hairs are coated.
- Wait approximately 30-60 seconds for the glue to become tacky. This tackiness is essential for effectively shaping the brows.
Step 2: Brush and Shape Your Brows
- Using a clean spoolie, carefully brush your brow hairs upwards and outwards into your desired shape. Work in small sections, ensuring each hair is perfectly positioned.
- Press the hairs down gently with your finger or a clean cotton pad to ensure they lie flat against your skin. This is where the lamination effect truly begins to take shape.
- Once you are satisfied with the shape, apply a small piece of plastic wrap (cling film) over the brow, pressing it down to help the hairs stay in place.
Step 3: Apply the Perm Solution (Lifting Lotion)
- Remove the plastic wrap. Apply a generous, even layer of the perm solution (often labeled ‘Lifting Lotion’ or ‘Step 1’) to the brow hairs, avoiding contact with the skin as much as possible.
- Re-cover the brow with a fresh piece of plastic wrap.
- Timing is Crucial: This is the most critical step for timing. Consult your kit’s instructions carefully. Typically, the perm solution is left on for 6-10 minutes, depending on your hair thickness and texture. Finer hairs require less time, thicker hairs more. Never exceed the maximum recommended time.
- After the recommended time, gently remove the plastic wrap and carefully wipe off the perm solution with a dry cotton pad or Q-tip, brushing the hairs in their newly set direction.
Step 4: Apply the Setting Lotion (Fixing Lotion)
- Apply an even layer of the setting lotion (often labeled ‘Fixing Lotion’ or ‘Step 2’) over the entire brow, ensuring all hairs are covered and remain in their upward, desired position.
- Re-cover the brow with plastic wrap.
- Timing: Again, adhere to your kit’s instructions. The setting lotion usually stays on for a similar duration as the perm solution, typically 6-10 minutes. This solution locks the brow hairs into their new shape.
- After the recommended time, remove the plastic wrap and thoroughly wipe off the setting lotion with a damp cotton pad.
Step 5: Apply the Nourishing Oil/Serum
- Once all solutions are removed, apply a generous amount of the nourishing oil or serum (often labeled ‘Nourishing Lotion’ or ‘Step 3’) to your brows. This step is vital for rehydrating and conditioning the hairs, preventing dryness and damage.
- Brush the oil through your brows with a clean spoolie. Do not rinse this off.
Repeat the entire process for your other brow. Take your time, be precise, and follow the instructions provided with your specific brow lamination at home kit. Patience here will yield the best results.
Essential Aftercare for Long-Lasting Brow Lamination
The first 24-48 hours post-lamination are critical for the longevity and health of your brows. Proper aftercare will ensure your brow lamination at home lasts as long as possible and looks its best.
- Avoid Water for 24-48 Hours: Do not get your brows wet for at least 24 hours, ideally 48. This includes showers, sweating, and washing your face. Water can disrupt the setting process and undo the lamination.
- Avoid Steam and Excessive Heat: Steamy showers, saunas, and intense workouts should be avoided for the same reason as water.
- No Makeup or Skincare on Brows: Refrain from applying any makeup, serums, or creams to your brows for the initial 24-48 hours.
- Don’t Touch or Rub: Avoid touching, rubbing, or sleeping on your brows to prevent disturbing the newly set hairs.
- Daily Nourishment: After the initial 24-48 hour period, continue to apply a nourishing oil (like castor oil, argan oil, or the one provided in your kit) to your brows daily. This keeps them hydrated, healthy, and flexible, preventing brittleness.
- Brush Daily: Gently brush your brows into your desired shape each morning with a clean spoolie. This helps maintain the laminated look.
- Avoid Harsh Products: Steer clear of harsh cleansers, exfoliants, or retinoids directly on your brows, as these can strip the lamination.
Following these aftercare instructions diligently will ensure your brow lamination at home remains stunning for 4-8 weeks, depending on your hair growth cycle and how well you maintain them.
Troubleshooting Common At-Home Brow Lamination Issues
Even with the best intentions, sometimes things don’t go exactly as planned. Here are some common issues you might encounter when doing brow lamination at home and how to address them:
- Brows Aren’t Lifting Enough: If your brows don’t look as lifted or defined as you’d hoped, it’s likely due to insufficient processing time for the perm solution or not enough adhesive to hold them in place. This can also happen if your brows were too oily before application. Wait at least 6-8 weeks before attempting another lamination to avoid over-processing.
- Brows Look Frizzy or Over-Processed: This is a sign that the perm solution was left on for too long. Over-processing can damage the hair bonds, leading to a frizzy or crimped appearance. The best course of action is to apply nourishing oil regularly, trim any severely damaged ends, and let your brows recover. Avoid further chemical treatments until they are healthy again.
- Skin Irritation/Redness: This could be an allergic reaction (hence the importance of a patch test!) or the solutions coming into contact with your skin. If it’s mild, apply a soothing, fragrance-free cream. If severe, consult a doctor. Always ensure you apply a barrier cream around your brows.
- Uneven Lamination: If one brow looks better than the other, it might be due to uneven application of solutions or not brushing the hairs uniformly. Practice makes perfect, and focusing on one brow at a time can help ensure symmetry.
- Hairs Not Staying in Place: This often means the adhesive wasn’t tacky enough, or you didn’t press the hairs down firmly enough after shaping. Ensure your brows are completely clean and dry before applying the glue.
Remember, brow lamination is a chemical process. If you’re unsure at any point, it’s always best to err on the side of caution or consult with a professional brow technician.
Advanced Tips for Perfect Brow Lamination in 2026
Once you’ve mastered the basics of brow lamination at home, here are some advanced tips to elevate your results:
- Consider Your Brow Hair Direction: While the goal is generally to brush hairs upwards, observe your natural brow growth. Some areas might benefit from being brushed slightly more sideways or diagonally to create a more natural, feathered look rather than a strictly vertical one.
- Section Your Brows: For very thick or long brows, consider working in smaller sections (e.g., inner corner, arch, tail) when applying glue and shaping. This allows for more precise control over each hair.
- Use a Micro-Applicator: For very precise application of solutions and to minimize contact with the skin, consider using micro-applicator brushes, which are finer than standard Q-tips.
- Hydration is Key: In addition to post-lamination nourishing oil, consider using a brow conditioner or serum in between lamination sessions to keep your brow hairs strong and healthy. Healthy hairs respond better to the lamination process.
- Don’t Rush the Setting: While timing is crucial, don’t rush the setting lotion step. This is what truly locks in the shape. Ensure even coverage and adequate processing time.
- Gentle Removal: When removing solutions, always wipe gently in the direction of the hair growth. Harsh rubbing can disrupt the newly formed bonds.
- Observe Your Hair Type: Pay close attention to how your hair reacts to the patch test. If your hair is very fine, it will process faster. If it’s coarse, it will need closer to the maximum recommended time. Adjust accordingly for future applications.
- Pair with a Tint: For an even more dramatic effect, consider tinting your brows after the lamination process. Always laminate first, then tint, and ensure you use a gentle tint that won’t strip the lamination. Wait at least 24-48 hours after lamination before tinting.
These advanced techniques, combined with consistent aftercare, will help you achieve and maintain stunning brow lamination at home results that rival professional salon treatments.
The Future of At-Home Brow Lamination in 2026 and Beyond
As we look towards the future, the brow lamination at home trend shows no signs of slowing down. We can anticipate even more user-friendly kits, potentially incorporating smart technology for precise timing or personalized formulas based on hair type. Sustainable and ethically sourced ingredients will become increasingly important to consumers, leading to greener beauty options.
Furthermore, expect to see more hybrid products that combine lamination with nourishing treatments or even subtle tinting, streamlining the entire brow routine. Educational resources, including virtual masterclasses and AI-powered guides, will likely become more prevalent, making it even easier for individuals to confidently achieve professional results at home.
The beauty industry is continually innovating, and the convenience and empowerment offered by DIY beauty treatments like brow lamination are here to stay. By staying informed and practicing safe application, you can continue to enjoy perfectly groomed, on-trend brows from the comfort of your own home for years to come.
Conclusion: Your Path to Perfect Brows at Home
Achieving flawless brow lamination at home in 2026 is an accessible and rewarding beauty endeavor. With the right kit, careful preparation, precise application, and diligent aftercare, you can transform your brows into beautifully sculpted, fuller-looking frames for your face. Remember to prioritize safety by performing a patch test and strictly adhering to the instructions provided with your chosen kit.
Embrace the confidence that comes with perfectly groomed brows, knowing you’ve mastered a professional technique from the comfort of your own space. Say goodbye to daily brow struggles and hello to effortlessly stunning eyebrows. Your journey to impeccable brow lamination at home starts now!


