Master the Art of Contouring: Your 5-Step Guide to a Sculpted Face
Master the art of contouring in 5 easy steps to sculpt your face like a pro: identify your face shape, choose the right products, apply strategically, blend seamlessly, and highlight for a flawless finish.
Want to achieve a perfectly sculpted face? Master the art of contouring: sculpt your face like a pro in 5 easy steps with our comprehensive guide. Learn how to enhance your features and create a flawless look every time.
Understand Your Face Shape
The first step to mastering contouring is knowing your face shape. Different shapes require different contouring techniques to achieve the most flattering results. It’s important to identify whether you have a round, square, oval, heart, or diamond-shaped face.
Identifying Round Face Shapes
Round faces have soft curves and similar width and length. The goal is to add dimension and create the illusion of angles.
Identifying Square Face Shapes
Square faces have a strong jawline and similar width across the forehead and jaw. Contouring aims to soften the edges and add roundness.
- Oval: Contour the forehead and chin to maintain balance.
- Heart: Soften the chin with contour and widen the forehead with highlight.
- Diamond: Highlight the center of the forehead and chin, contouring the cheekbones.
By taking the time to understand and identify your unique face shape, you’ll be in a much better position to apply contouring techniques effectively and enhance your natural features.
Choose the Right Contouring Products
Selecting the right contouring products is crucial for achieving a natural and seamless finish. There are various types of products available, each with its own set of advantages. Consider powder, cream, and stick formulations.
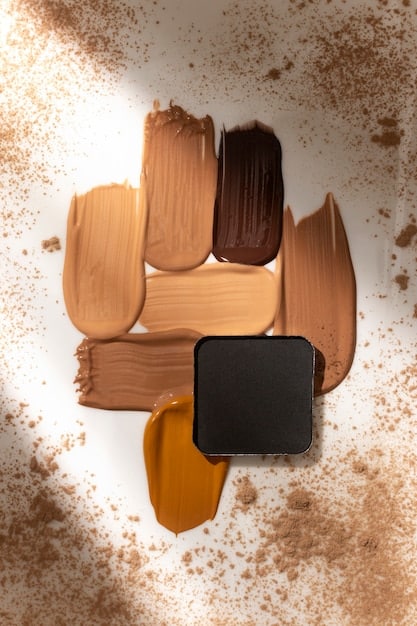
When exploring contouring products, experiment with different forms to discover what feels most intuitive and provides the best results for your skin type and desired look. Consider the staying power of these products. Choosing makeup that is long-lasting will ensure you look flawless for hours.
Powder Contours
Powder contours are great for those with oily skin. They provide a matte finish and are easy to blend.
Cream Contours
Cream contours work well for dry skin and offer a dewy, natural look. They blend seamlessly into the skin.
- Stick Contours: Easy to apply and great for beginners.
- Contour Kits: Offer multiple shades for a customizable look.
- Bronzers: Can double as contours if they have the right undertone.
Choosing the right contouring products ensures you achieve the desired effect, whether it’s a soft, natural sculpt or a more dramatic, defined look.
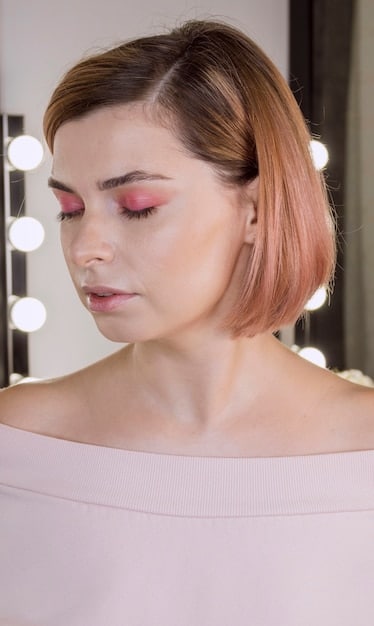
Master the Application Technique
Applying contour correctly is key to achieving a sculpted look. The goal is to create shadows where they naturally occur to enhance your features.
Contouring the Cheeks
Start by finding the hollows of your cheeks. Apply contour just below the cheekbones, blending upwards towards the hairline.
Contouring the Jawline
Apply contour along the jawline to define it and create a more angular appearance.
- Contouring the Nose: Apply thin lines of contour along the sides of the nose to make it appear slimmer.
- Contouring the Forehead: Apply contour along the hairline to reduce the size of the forehead.
- Blending is Crucial: Always blend well to avoid harsh lines.
Mastering the application technique takes practice, but with a little patience, you can achieve a professional-looking contour every time.
Blending for a Flawless Finish
Blending is arguably the most critical step in the contouring process. Poor blending can result in harsh lines and an unnatural appearance, defeating the purpose of contouring altogether. Ensure you have the right tools and techniques to blend effectively.
Using the Right Tools
Invest in quality blending brushes or sponges. These tools make it easier to achieve a seamless finish.
Blending Techniques
Use small, circular motions to blend the contour into your skin. Focus on softening the edges.
- Stippling: Use a stippling motion to blend cream contours for a natural look.
- Buffing: Use a buffing brush to blend powder contours seamlessly.
- Check in Natural Light: Ensure the contour looks natural in daylight.

Proper blending ensures that your contour looks like a natural shadow, enhancing your features without appearing artificial.
Highlight to Enhance Your Features
Highlighting is the perfect complement to contouring. It brings light to the high points of your face, creating dimension and drawing attention to your best features.
Choosing the Right Highlighter
Select a highlighter that complements your skin tone. Options include powder, cream, and liquid formulas.
Applying Highlighter
Apply highlighter to the high points of your face, such as the cheekbones, brow bones, and bridge of the nose. Use a light hand.
- Inner Corners of the Eyes: Brighten the eyes with a touch of highlighter.
- Cupid’s Bow: Define the lips with a small amount of highlighter.
- Center of the Chin: Add dimension to the lower part of the face.
Highlighting, when done correctly, adds a youthful glow and enhances the sculpted effect created by contouring.
| Key Point | Brief Description |
|---|---|
| 🧐 Know Your Face Shape | Identify if you have a round, square, oval, heart, or diamond-shaped face. |
| 🎨 Select Right Products | Choose powder for oily skin, cream for dry skin, or stick contours for easy application. |
| 🖌️ Apply Strategically | Contour cheeks, jawline, and nose for definition, always blend well for a natural look. |
| ✨ Highlight Features | Apply highlighter to cheekbones, brow bones, and nose bridge to enhance features. |
Frequently Asked Questions
For fair skin, choose a cool-toned contour shade that is one to two shades darker than your natural skin tone. This will create a subtle shadow without looking too harsh.
Bronzer can be used as contour if it has a matte finish and cool undertones. Avoid bronzers with shimmer or warm undertones, as they are better suited for adding warmth to the skin.
To avoid a muddy contour, use a light hand when applying the product and blend thoroughly. Start with a small amount of product and build up the intensity as needed.
For blending contour, use a dense, angled brush for powder products or a damp makeup sponge for cream products. These tools will help you achieve a seamless and natural finish.
Apply highlighter to the high points of your face where light naturally hits, such as the cheekbones, brow bones, bridge of the nose, inner corners of the eyes, and Cupid’s bow.
Conclusion
Mastering the art of contouring involves understanding your face shape, selecting the right products, applying strategic techniques, blending seamlessly, and highlighting your best features. With practice and attention to detail, anyone can achieve a perfectly sculpted look.


