Master the Cut Crease: Step-by-Step Tutorial for a Dramatic Eye Look
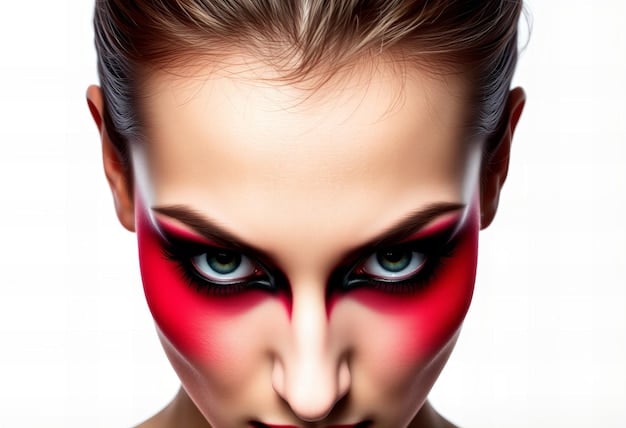
A cut crease is a makeup technique that enhances the eyes by creating a sharp, defined line in the crease, adding depth and drama; this tutorial provides a step-by-step guide to achieving this striking eye look.
Ready to elevate your eye makeup game? The how to create a cut crease: a step-by-step tutorial for a dramatic eye look is a stunning technique that instantly adds depth and definition to your eyes, making them pop. This guide will break down the process into easy-to-follow steps, so you can achieve a flawless cut crease every time.
What is a Cut Crease and Why Try It?
A cut crease is a makeup technique where a sharp, defined line is created in the crease of the eye. This line separates the lid color from the brow bone highlight, creating a dramatic and eye-catching effect. It’s a favorite among makeup artists and enthusiasts for its ability to make eyes appear larger and more defined.
But why should you try it? Well, a cut crease can transform your entire look. It adds dimension and depth, making your eyes the focal point of your face. It’s perfect for special occasions, photoshoots, or anytime you want to make a statement.
Benefits of a Cut Crease
Here are a few reasons why you should master the art of the cut crease:
- Enhanced Definition: It defines the eye crease, making your eyes appear more sculpted.
- Larger Eye Appearance: The contrast created by the cut crease can make your eyes look bigger and more open.
- Dramatic Effect: Perfect for creating a bold and glamorous look.
Now that you know why it’s worth trying, let’s get started with the tutorial. In the following sections, we’ll walk you through all the tools and steps, so you’ll be able to create impressive cut crease!
In essence, learning about cut creases goes beyond merely acquiring a makeup technique; it’s about unleashing your artistic potential and expressing your unique style, while also understanding that makeup serves as a powerful tool for self-expression.
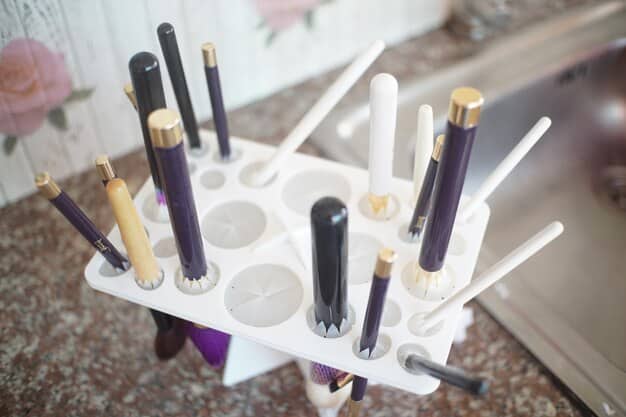
Gather Your Supplies
Before you dive into the application process, it’s essential to gather all the necessary supplies. Having everything you need at your fingertips will make the process smoother and more enjoyable. There’s an array of options to choose from, starting from simple supplies for a simple look, to items that will help you nail a bolder, more complex, look.
Here’s a list of what you’ll need:
- Eyeshadow primer
- Neutral eyeshadows (matte shades)
- Darker eyeshadows (matte or shimmer)
- Concealer (1-2 shades lighter than your skin tone)
- Small, flat brush
- Blending brushes
- Eyeliner (liquid or gel)
- Mascara
- False eyelashes (optional)
Choosing the Right Products
Selecting the right products and brushes is crucial for achieving a flawless cut crease. Consider the options based on your desired look, skin type and preference.
- Eyeshadow Primer: Essential for creating a smooth base and ensuring your eyeshadow lasts all day.
- Eyeshadows: Choose a range of colors that complement your skin tone and create the contrast needed for the cut crease.
- Concealer: A creamy concealer with good coverage is necessary for carving out the cut crease.
Choosing the tools needed is the best way to guarantee efficiency and an amazing result for your makeup. Experiment with brushes and supplies to find the perfect fit for your needs!
As you delve deeper into the world of cut creases, you’ll encounter a plethora of product options and techniques. With this, practice makes perfect, and there’s nothing you that a little bit of experimentation cannot solve.
Step-by-Step Cut Crease Tutorial
Now that you’ve gathered your supplies, let’s get into the step-by-step tutorial. This process might seem intimidating at first, but with practice, you’ll get the hang of it.
Follow these steps closely for a flawless cut crease:
- Apply eyeshadow primer to your eyelids.
- Apply a neutral eyeshadow to your crease as a transition shade.
- Using a small, flat brush, apply concealer to your eyelid.
- Set the concealer with a light eyeshadow.
- Apply a darker eyeshadow to the outer corner of your eye.
- Blend the darker eyeshadow into the crease.
- Apply eyeliner to your upper lash line.
- Apply several coats of mascara.
- Apply false eyelashes (optional).
This process is very detailed, so it is a good idea to proceed slowly through each one of the steps. Rushing through might create a bad makeup look. Always prioritize time and focus!
Mastering the Art of Blending
Blending is arguably the most important step in a cut crease because it guarantees a good transition between colors and an overall smooth look. Without proper blending, your makeup will look patchy and unfinished. To get the hang of this essential art, focus in the following tips.
Here are some tips for effective blending:
- Use the Right Brushes: Invest in good quality blending brushes. Fluffy, tapered brushes work best.
- Light Pressure: Apply light pressure when blending. Use small, circular motions to gradually blend the colors together.
- Layer Colors: Build up the color gradually instead of applying too much at once. This makes blending easier.
Understanding Color Transitions
Understanding how colors transition is crucial for achieving a seamless blend. Color Transitions are essential to create perfect makeup as they make the look more harmonious.
- Start with Light Colors: Begin with lighter shades and gradually add darker colors. This helps create a smooth gradient.
- Use a Transition Shade: Apply a transition shade between the crease color and the brow bone highlight. This helps blend the colors together seamlessly.
- Blend, Blend, Blend: Keep blending until there are no harsh lines or visible edges.
With blending, patience is key here. Don’t rush the process! Good transitions can elevate the final result of your eye makeup.
Experimenting with Different Styles
Once you’ve mastered the classic cut crease, don’t be afraid to experiment with different styles and variations. The most important thing is to have fun while doing it, so don’t be afraid to explore!
Here are a few ideas to inspire you:
- Halo Cut Crease: This style features a bright shimmer shade in the center of the lid, surrounded by darker shades in the inner and outer corners.
- Glitter Cut Crease: Add some sparkle to your cut crease by applying glitter to the lid or along the crease line.
- Reverse Cut Crease: Instead of carving out the crease with concealer, apply a dark shade to the lid and blend it upwards into the crease.
Maintaining Your Cut Crease Throughout the Day
Creating a stunning cut crease is one thing, but ensuring it lasts throughout the day is another. The main goal is to prevent smudging, fading, and creasing.
Here are some tips for keeping your cut crease looking fresh all day:
- Use a Setting Spray: A good setting spray can help lock in your makeup and prevent it from smudging or fading.
- Avoid Touching Your Eyes: Touching your eyes can transfer oils and cause your makeup to break down.
- Carry Touch-Up Products: Keep a small concealer and blending brush in your purse for quick touch-ups throughout the day.
This way, you will be able to keep the cut crease you spent so long to build looking amazing!
Remember that makeup is a dynamic art form, so feel free to explore and create looks that resonate with you. Always test products and techniques in order to guarantee the best results.

Common Mistakes and How to Avoid Them
Even with careful application, some common mistakes can occur when creating a cut crease. It’s important to be aware of these pitfalls and know how to avoid them.
- Uneven Crease Line: Make sure the crease line is even on both eyes. Use a small mirror to check for symmetry.
- Harsh Lines: Blend the edges of the crease line to avoid harsh lines. Use a fluffy blending brush for a seamless transition.
- Too Much Concealer: Use a small amount of concealer at a time to avoid creasing. Set the concealer with a light eyeshadow.
Troubleshooting Tips
Encountering problems during the process is normal. Troubleshooting and solving these issues will improve your technique greatly. Here are some issues and the solutions for then:
- Eyeshadow Fallout: Prevent eyeshadow fallout by tapping off excess product from your brush before applying.
- Creasing: If your eyeshadow is creasing, try using a more emollient primer or setting your concealer with a powder.
- Smudging: Prevent smudging by using waterproof or smudge-proof products and avoiding touching your eyes.
Remember that overcoming these common mistakes is part of the learning process. Embrace the journey, stay patient, and celebrate each small victory along the way.
| Key Step | Brief Description |
|---|---|
| ✨ Apply Primer | Create a smooth base to make the eyeshadow last long. |
| 🎨 Apply Eyeshadow | Apply a transition shade and create depth using blending brushes. |
| 🔪 Cut the Crease | Apply concealer on the eyelid to define the crease. Blend well. |
| 🌟 Final Touches | Wear eyeliner and mascara! Add some bright glitter and false lashes for a dramatic look. |
Frequently Asked Questions
▼
The cut crease look is a makeup technique where a defined line is created in the crease of the eye using concealer and eyeshadow to add depth and definition.
▼
A cut crease is often considered too dramatic for every day, but you can create a soft look in neutral colors for casual wear. Adjust the intensity and color palette!
▼
Hooded eyes can wear a cut crease look perfectly! When creating the crease, make sure it is visible when your eyes are open. Thinner lines and lighter shadows would be the go-to!
▼
To prepare your eyelids, apply an eyeshadow primer to create a smooth base, even out skin tone, and ensure your eyeshadow lasts all day without creasing.
▼
Choose eyeshadow colors that complement your skin tone and eye color. Neutral colors work well for a natural look, while vibrant colors are great for bolder looks.
Conclusion
Mastering the how to create a cut crease: a step-by-step tutorial for a dramatic eye look takes time and practice, but the results are well worth the effort. By following this comprehensive tutorial and experimenting with different styles, you’ll be able to transform your eye makeup game and create stunning looks that make a statement. Now, get started with blending and have some fun!


