Beginner’s Eyeshadow Blending: 4 Steps to a Pro Finish by 2025
Achieving a professional eyeshadow look by 2025 is attainable for beginners through understanding brush selection, product application, and mastering four fundamental blending techniques for seamless transitions.
Are you ready to elevate your eye makeup game and achieve that coveted, seamless look? This beginner’s guide to eyeshadow blending will walk you through four simple yet effective steps to ensure a professional finish by 2025, transforming your routine from frustrating to fabulous.
Understanding the Essentials: Tools and Products
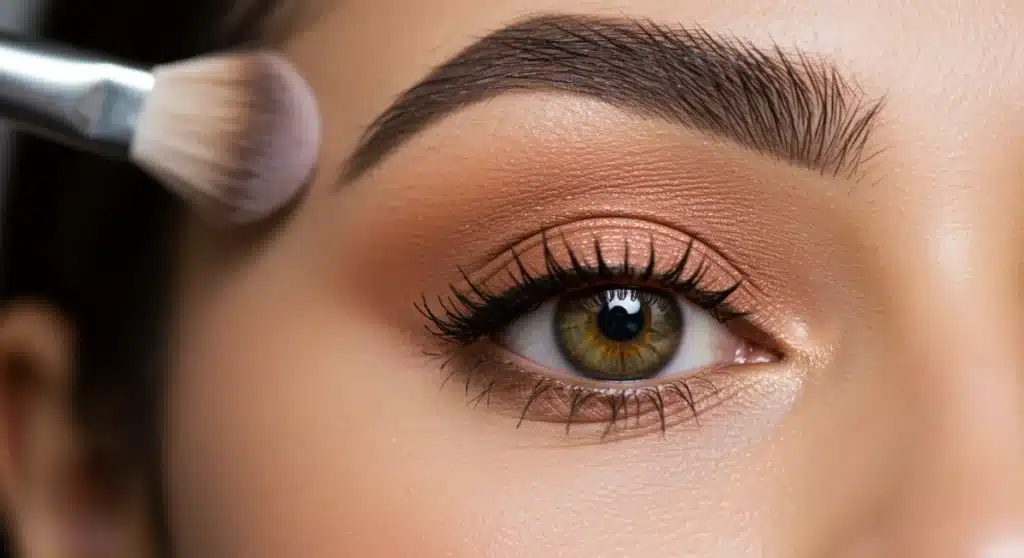
Before diving into the art of blending, it’s crucial to understand the fundamental tools and products that will make your journey smoother and more successful. The right equipment can make all the difference, especially when you are just starting out. Selecting appropriate brushes and knowing your eyeshadow types are the first steps toward achieving a professional-looking result.
Good quality brushes are not just a luxury; they are an investment in your makeup skills. Different brushes serve different purposes, and using the correct one for each step will significantly improve your blending. Furthermore, understanding the various formulations of eyeshadows will help you choose products that blend easily and last longer on your lids.
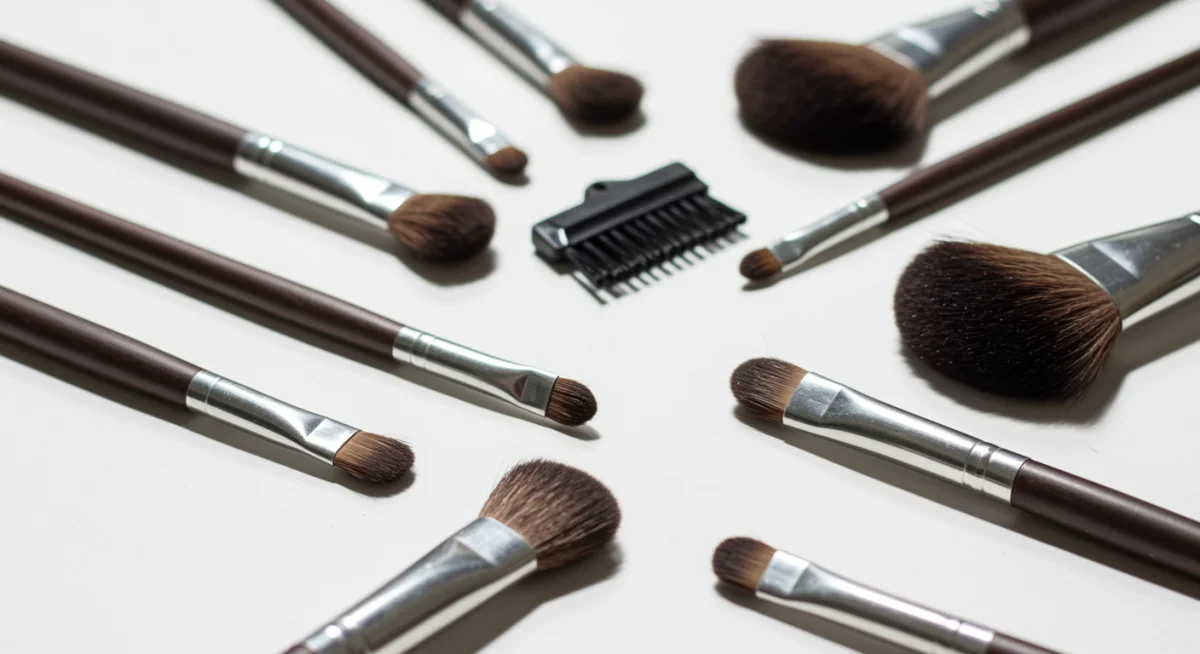
Choosing the right brushes
The world of makeup brushes can seem overwhelming, but for eyeshadow blending, a few key types are indispensable. These brushes are designed to pick up and distribute product efficiently, allowing for smooth, diffused edges.
- Fluffy blending brush: Essential for diffusing harsh lines and creating a soft transition between colors. Look for one with soft, natural bristles.
- Tapered blending brush: Ideal for more precise blending in the crease and outer corner, allowing for controlled application and definition.
- Flat shader brush: Best for packing color onto the lid, ensuring intense pigment payoff before blending.
- Pencil brush: Perfect for detailing, smudging eyeliner, or applying shadow to the lower lash line with precision.
Selecting your eyeshadows
Eyeshadow formulations vary widely, and some are more beginner-friendly than others. Powder eyeshadows are generally the easiest to work with for blending, offering buildable coverage and smooth diffusion. Cream and liquid shadows require a bit more practice but can provide intense color and longevity.
For beginners, starting with a neutral palette that includes matte and shimmer shades is advisable. These palettes usually offer a range of complementary colors, making it easier to experiment with different looks without feeling overwhelmed. Pay attention to the pigment quality; highly pigmented shadows often blend more effortlessly.
Mastering the basics of tools and products sets a solid foundation for flawless eyeshadow application. With the right brushes and a well-chosen palette, you’re already halfway to achieving a polished, blended look.
Step 1: Preparing Your Eyelids for Longevity
Proper eyelid preparation is often overlooked but is a critical step in ensuring your eyeshadow blends seamlessly and lasts all day. Without a well-prepared canvas, even the most expensive eyeshadows can crease, fade, or appear patchy. This initial step creates a smooth, even surface for your makeup application.
Think of it as priming a wall before painting; it ensures the paint adheres better and the finish is impeccable. Similarly, preparing your eyelids prevents oiliness from breaking down your shadow and helps colors appear more vibrant and true to tone. It’s a small effort with significant impact on your final look.
Applying an eyeshadow primer
Eyeshadow primer is your secret weapon for long-lasting, vibrant eyeshadow. It creates a tacky base that grips onto the eyeshadow pigments, preventing creasing and intensifying color payoff. A thin layer is all you need, applied evenly across the entire eyelid, from lash line to brow bone.
When choosing a primer, consider your skin type. If you have oily eyelids, a mattifying primer can help control shine. For dry eyelids, a hydrating primer can prevent flakiness. Allow the primer a minute or two to set before moving on to eyeshadow application. This brief waiting period ensures the product is sufficiently tacky to hold your shadows.
Some primers also offer color correction, neutralizing redness or discoloration on the eyelids, which further helps in making your eyeshadow colors pop. This initial layer ensures uniformity and a consistent base for all subsequent products.
Setting the primer (optional but recommended)
While not always essential, setting your primer with a neutral, matte eyeshadow or a translucent powder can create an even smoother surface for blending. This step is particularly beneficial for beginners as it reduces friction, allowing your blending brushes to glide effortlessly across the lid.
Use a large, fluffy brush to lightly dust a small amount of powder over the primed area. Choose a shade that matches your skin tone or is slightly lighter. This creates a soft, almost velvety finish, making it easier to build and blend subsequent layers of eyeshadow without any tugging or patchy application. This preparation stage is fundamental for a flawless eyeshadow blending experience.
Step 2: Laying the Foundation with Base and Transition Shades
Once your eyelids are prepped, the next crucial step is to lay down your base and transition shades. These colors are the backbone of any well-blended eyeshadow look, providing a smooth gradient and preventing harsh lines. They act as a bridge between your skin tone and the deeper, more intense colors you’ll apply later.
This stage is where you begin to build the overall shape and dimension of your eye look. Taking your time here will ensure that subsequent colors meld together effortlessly, resulting in a cohesive and professional finish. It’s about creating a soft, diffused canvas before introducing more prominent shades.
Applying a neutral base shade
Start by applying a neutral base shade all over your eyelid. This should be a matte color that is close to your skin tone or slightly lighter. Use a flat shader brush to pack the color onto the lid, from the lash line up to the brow bone. This step helps to even out your skin tone and provides a uniform canvas for the transition shade.
A good base shade can also help to cancel out any remaining redness or discoloration that the primer might not have fully covered. This ensures that the true colors of your subsequent eyeshadows will show through accurately, without being influenced by your natural skin undertones. It’s a subtle yet powerful technique.
Introducing the transition shade
The transition shade is arguably the most important color for seamless blending. It should be a matte shade, typically one or two shades darker than your base, and often in a warm or cool neutral tone depending on your desired look. Apply this color into your crease using a fluffy blending brush.
- Placement: Focus the transition shade in the crease, which is the hollow area above your eyelid and below your brow bone.
- Motion: Use soft, circular motions or windshield wiper motions to blend the color back and forth.
- Light hand: Start with a small amount of product and build up the intensity gradually. This prevents over-application and ensures easier blending.
The goal is to create a soft, diffused wash of color that subtly defines the crease without any harsh edges. This shade will serve as the perfect buffer between your deeper crease colors and your brow bone highlight, making the entire look appear polished and professional. Patience is key here; blend until the edges disappear into your skin and the base shade.
Step 3: Building Depth and Dimension with Crease and Outer V Colors
With your base and transition shades in place, it’s time to add depth and dimension to your eye look. This step involves applying darker shades to the crease and outer ‘V’ of your eye, creating definition and shaping the eye. This is where the magic of blending truly comes alive, transforming flat color into a multi-dimensional masterpiece.
These deeper shades are crucial for adding intensity and making your eyes stand out. The careful application and blending of these colors will give your eyes a more sculpted and captivating appearance. It’s about strategically placing darker tones to create shadows and highlights that enhance your natural eye shape.
Defining the crease
Using a slightly darker matte shade than your transition color, apply it precisely into the crease of your eye. A tapered blending brush is ideal for this step, as it allows for more controlled application. Focus the color initially on the outer half of your crease and then gently blend it inwards, keeping the intensity concentrated in the outer corner.
The key here is to build the color gradually. Start with a small amount of product and add more if needed. Blend in small, circular motions, ensuring that the new shade seamlessly merges with your transition color. Avoid bringing the dark color too far down onto the lid, as this can make your eyes appear smaller. The aim is to create a soft gradient from your transition shade to this deeper crease color.
Creating the outer ‘V’
The outer ‘V’ is the area formed by the outer corner of your lash line and the outer part of your crease. Applying a very dark shade here adds significant depth and intensity. Use a pencil brush or a small, dense blending brush for this step.
- Placement: Apply the darkest shade in a ‘V’ shape, connecting the outer lash line to the outer crease.
- Blending technique: Blend the edges inwards towards the center of your lid and upwards into the crease color.
- Softness: Ensure there are no harsh lines by continuously blending with soft, feathery strokes.
- Intensity: Build up the darkness gradually until you achieve your desired level of intensity.
This technique creates a smoky, elongated effect, enhancing the overall shape of your eye. Remember to frequently switch back to your fluffy blending brush (without adding more product) to soften any edges and ensure a seamless blend between all the shades. This continuous blending is what truly makes an eyeshadow look professional.
Step 4: Adding Highlights and Finishing Touches for a Polished Look
With the core blending complete, the final step involves adding highlights and refining your look to achieve that professional, polished finish. Highlights bring light to certain areas, making your eyes appear brighter and more open, while finishing touches ensure everything is cohesive and long-lasting.
These small details can significantly elevate your entire eye makeup, providing a luminous touch and bringing all the elements together. It’s about adding that extra sparkle and ensuring your hard work in blending is beautifully showcased.
Applying brow bone and inner corner highlights
Highlighting the brow bone and inner corner of your eye instantly brightens and lifts your entire look. Use a light, shimmery eyeshadow or a dedicated highlighter for these areas. For the brow bone, apply it just under the arch of your eyebrow, blending it downwards into your transition shade.
For the inner corner, dab a small amount of highlighter with a pencil brush or your fingertip. This opens up the eye and creates a fresh, awake appearance. The shimmer here catches the light, drawing attention to your eyes. Choose a highlight shade that complements your overall eyeshadow palette.
Blending everything together
The final blending pass is crucial. Take a clean, fluffy blending brush (without any product) and gently sweep it over your entire eyeshadow application. This helps to further diffuse any remaining harsh lines and meld all the colors together seamlessly. Think of it as a final polish to ensure a smooth, gradient transition between all shades.
This step also helps to remove any excess product, preventing a heavy or cakey appearance. Your goal is to achieve a soft, watercolor-like effect where one color gently melts into the next. Don’t be afraid to go back and forth between different brushes to perfect the blend.
Finishing with eyeliner and mascara
To complete your professional eyeshadow look, add eyeliner and mascara. Eyeliner defines the lash line and can enhance the shape of your eyes. Whether you prefer a subtle tight line or a dramatic winged liner, choose a style that complements your eyeshadow.
Finally, a few coats of mascara will open up your eyes, making your lashes appear longer and fuller. Curl your lashes before applying mascara for maximum impact. These finishing touches frame your beautifully blended eyeshadow, bringing the entire look to a stunning conclusion. Remember, practice makes perfect, so keep experimenting with different colors and techniques to find what works best for you.
Common Blending Mistakes and How to Avoid Them
Even with the best intentions, beginners can fall into common blending traps that hinder a professional finish. Recognizing these pitfalls and knowing how to steer clear of them is just as important as learning the correct techniques. Avoiding these mistakes will save you time and frustration, leading to consistently better results.
Understanding what can go wrong allows you to be more mindful during your application process. It’s about refining your technique through awareness and making small adjustments that yield significant improvements in your overall eyeshadow look.
Over-applying product initially
One of the most frequent mistakes is applying too much eyeshadow at once. This makes blending incredibly difficult, as you end up with a concentrated patch of color that’s hard to diffuse. Instead, always start with a minimal amount of product on your brush.
- Tap off excess: After picking up shadow, always tap your brush gently to remove any loose pigment.
- Build gradually: It’s easier to add more color than to take it away. Build intensity in thin layers.
- Light hand: Use a light touch when applying; heavy pressure deposits too much product.
This approach ensures better control and allows for softer, more natural transitions. If you do over-apply, try using a clean brush to gently blend and diffuse the color, or a small amount of translucent powder to soften the edges.
Using the wrong brush for the job
As discussed earlier, different brushes have distinct functions. Using a dense packing brush for blending, for example, will only push the product around rather than diffusing it. Conversely, trying to pack on color with a fluffy blending brush will result in poor color payoff.
Always ensure you are using the appropriate brush for each step: a flat shader for packing, a fluffy brush for diffusing, and a tapered brush for precise crease work. Having a small collection of essential brushes will significantly enhance your blending capabilities.
Not blending enough (or blending too much)
Finding the right balance in blending is an art. Not blending enough leaves harsh lines and distinct patches of color, making the look appear unpolished. On the other hand, over-blending can muddy colors together, making them lose their individual definition and vibrancy.
The goal is to blend until there are no visible harsh lines, but the distinct shades are still discernible. Use soft, circular, or windshield wiper motions, and remember to use a clean brush for the final blend. Practice is key to developing an intuitive sense of when to stop blending. Pay attention to how the colors interact and when they achieve a seamless, yet defined, gradient. This balance is critical for a truly professional finish.
Advanced Tips for Elevating Your Blending Skills
Once you’ve mastered the foundational steps of eyeshadow blending, you might be ready to explore more advanced techniques that can further refine and customize your eye makeup. These tips are designed to take your skills to the next level, allowing for greater creativity and even more polished results. They offer subtle yet impactful ways to enhance your blending expertise.
Moving beyond the basics involves experimenting with different textures, understanding color theory more deeply, and refining your application methods. These advanced strategies will empower you to create a wider range of sophisticated eye looks with confidence and precision.
Experimenting with different textures
While powder eyeshadows are excellent for beginners, incorporating creams, liquids, and even gel formulas can add a new dimension to your looks. Cream shadows, for instance, can serve as an intense base for powder shadows, making them pop and last longer. Liquid shadows offer vivid color and can be blended out before they set.
- Layering: Apply a cream shadow first, then layer a similar powder shadow on top for enhanced intensity and longevity.
- Ombre effect: Use different textures to create unique ombre effects, blending a matte into a shimmer or a cream into a powder.
- Precision: Gel liners and shadows can be used for graphic looks or precise detailing that powder might not achieve as sharply.
Experimenting requires practice, but it opens up a world of creative possibilities. Start with one new texture at a time to get comfortable with its unique blending properties and drying time. This exploration will broaden your makeup artistry.
Understanding color theory for seamless transitions
Basic color theory can significantly improve your blending. Knowing which colors complement each other (analogous colors) and which create contrast (complementary colors) helps in choosing shades that blend harmoniously or create impactful statements.
For seamless transitions, stick to analogous colors (e.g., warm browns and oranges, cool blues and purples). For more dramatic looks, a pop of a complementary color can be strategically placed. Understanding undertones (warm, cool, neutral) of your eyeshadows and how they interact with your skin tone is also vital for a cohesive look. This knowledge allows you to select palettes that naturally enhance your features and blend effortlessly.
Refining your blending movements and pressure
Beyond just circular or windshield wiper motions, pay attention to the pressure you apply and the size of your blending movements. Lighter pressure creates softer diffusion, while slightly more pressure can help merge two colors more firmly.
Small, concentrated circular motions are great for precise blending in the crease, while wider, sweeping movements with a fluffy brush are perfect for diffusing the edges across a larger area. Practice varying your hand pressure and brush movements to see how they impact the blend. This nuanced control is what separates good blending from truly exceptional blending, allowing for a more customized and professional finish by 2025.
| Key Step | Brief Description |
|---|---|
| Preparation | Prime eyelids to ensure longevity and vibrant color payoff. |
| Foundation Shades | Apply base and transition colors for a smooth, initial gradient. |
| Depth & Dimension | Build crease and outer ‘V’ colors for definition and shape. |
| Finishing Touches | Add highlights, final blend, eyeliner, and mascara for a polished look. |
Frequently asked questions about eyeshadow blending
The most crucial brush for eyeshadow blending is a fluffy blending brush. Its soft, diffused bristles are perfect for seamlessly merging colors, eliminating harsh lines, and creating a smooth gradient across the eyelid. Investing in a good quality fluffy blending brush will significantly improve the overall finish of your eyeshadow looks.
To prevent eyeshadow creasing, always start with an eyeshadow primer. A good primer creates a tacky base that grips the shadow, preventing it from settling into fine lines. Additionally, setting your primer with a light layer of translucent powder or a neutral matte eyeshadow can further enhance its longevity and smooth application.
Transition shades are neutral, mid-tone eyeshadows applied in the crease to bridge the gap between your skin tone and deeper shades. They are important because they create a soft, diffused gradient, making deeper colors blend seamlessly without harsh edges. They are foundational for a professional, well-blended eye look.
While fingers can be effective for packing on shimmer or cream shadows, they generally aren’t ideal for precise blending, especially with powder eyeshadows. Fingers can deposit oils, leading to patchy application and less diffused results. For optimal blending, especially for beginners, investing in a few good quality brushes is highly recommended.
If your eyeshadow appears muddy from over-blending, you can try to salvage it. Use a clean, fluffy brush to gently sweep away excess product. If colors have completely merged, apply a small amount of your base or transition shade over the muddy area to neutralize it, then carefully reapply and blend your darker shades with a lighter hand.
Conclusion
Mastering eyeshadow blending is an accessible skill that significantly enhances your overall makeup artistry. By consistently following these four simple steps—preparing your eyelids, laying down base and transition shades, building depth, and adding highlights—you are well on your way to achieving a professional finish by 2025. Remember, practice is paramount, and each attempt refines your technique. Embrace the journey of learning, experiment with colors and brushes, and soon you’ll be creating stunning, seamlessly blended eye looks with confidence, reflecting the polished aesthetic Velvettouche champions.


